VOLUMETRIC FOG
First off we can start with the volumetric fog particle effect that I was going to use on my windows, this was something that had worked previous for me in terms of heavy fog. The reason I wanted to use it in this scene was to create the light shafts coming through the windows that are around the same strength as the one coming through the roof. The issue being it came with a lot of noise making it look unrealistic and even after feedback people began to mention that it was taking away from the aesthetic of the overall scene and instead drawing the eye towards it. I then found a countermeasure to this but it was never this harsh, if anything they're minuscule in comparison but they work. Below is a video of the failed attempt.
The fix for this (the only one that I've found) is going into the console and changing over the command for the volumetric fog which is r.VolumetricFog.GridSizeZ and either up-scaling the resolution but in doing so creates serious problems in terms of performance. Something that is very showy off but not enough results for games as a whole. Solution fixed, but only for me to find out it's useless as of now in games.
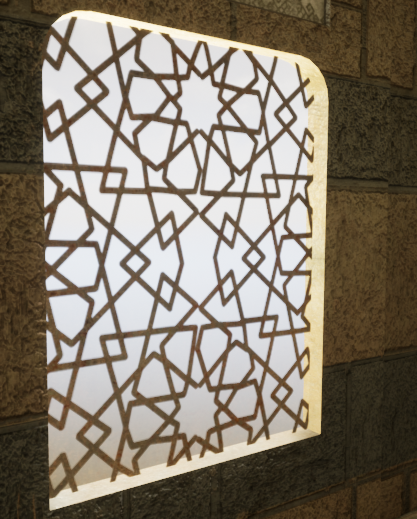
WINDOW ALPHA
My second concept that was cut was creating an asset for a window, the idea behind the window was to create a Moroccan styled window which has cross hatches. The same window that I tried to get the light shafts to come through on, I decided to firstly make the asset using geometry. This idea was good but can be minimalism and made cheaper, after talking with Chris & Mark they mentioned that you can get exactly the same result just using a alpha card. After hearing about this and using my knowledge from my previous project I decided to go into substance designer and create the alpha and test this theory. This is what you can see in the scene instead of the geometry piece.
 The solution for this one is basic, make a alpha card, insert the alpha onto the card and import that into UE4 and save yourself a bunch of geometry and texture amounts due to the alpha only using a small 1024 at max texture space. Solution very effective but wasted time on making the asset as a whole, things need to be thought through more efficiently next time. My failure on this particular piece was time.
CRIT
After finally recieving my crit, I was told many things about my scene. The scope was too large, there was no focal point and not only that but the layout of the scene was off in relation to the 'artistic styles' of what my peers believed to be the better outcome. After seeing what was meant by my lecturer Chris & Sharon by having them edit the look of my scene in Photoshop it was abundantly clear that my layout of the scene and unrealistic overlook of the scene was completely wrong.
Here is the photo created by them showcasing the concept of where I should be heading.

This was an upset to me knowing that my own creation wasn't meeting the artistic standard but I believe this to be because of my previous burning out on my last project. After they realized what I wanted they created this and I am grateful knowing that there are people I can work with who can help provoke my inner artistic passion and more. Although just a concept it has helped to shape my whole scene in general and yet not completely change my original grey-box.
ASSET CREATION (RUBBLE PILE)
The idea behind this asset creation was to make a rubble pile using Ilya Nedyals way showcased on LVL80 (https://80.lv/articles/rubble-modular-set-production/). This was a way of creating realistic rubble piles and allowing textures to be placed using color/material IDs. The way I set out to do this was to use my pre-existing assets and get results using them and then after creating new assets if the rubble pile came with good looking results.
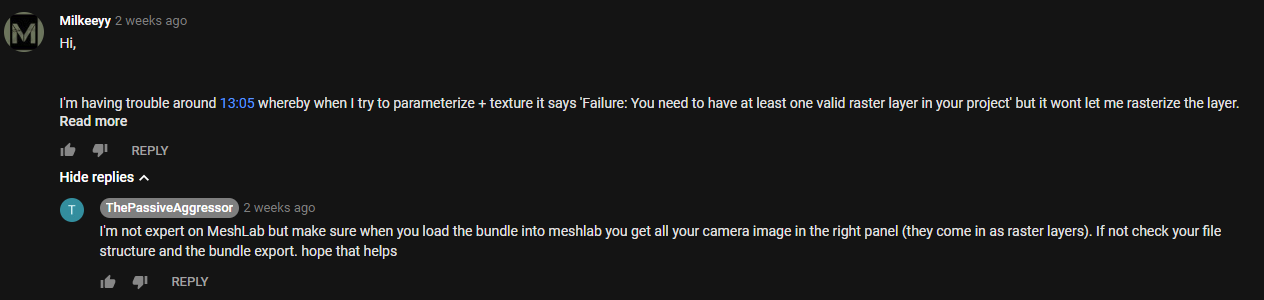
PHOTOGRAMMETRY
As I started to create my asset using Photogrammetry I had a few issues, primarily to do with my PC not being able to keep up with my unrealistic computations of wanting high end results whilst not using a render farm. Aside from my stupidity I asked a expert for help as the base tutorial I was following from YouTube helped me get an understanding of it and when I got stuck I kept referring back to it. The conversation is below, my photos wouldn't load into MeshLab but I realised after being told that I was using my Dense mesh which didn't contain any photos because this was data extracted from the photos instead of using the photo bundler file that I was meant to extract in the first place. Although the comments are from two weeks ago I learnt this as he replied and immediately fixed it.
After all of these outcomes I've found myself using forums and feedback more and more meaning to acquire my highest level of art is through teamwork and art appreciation.
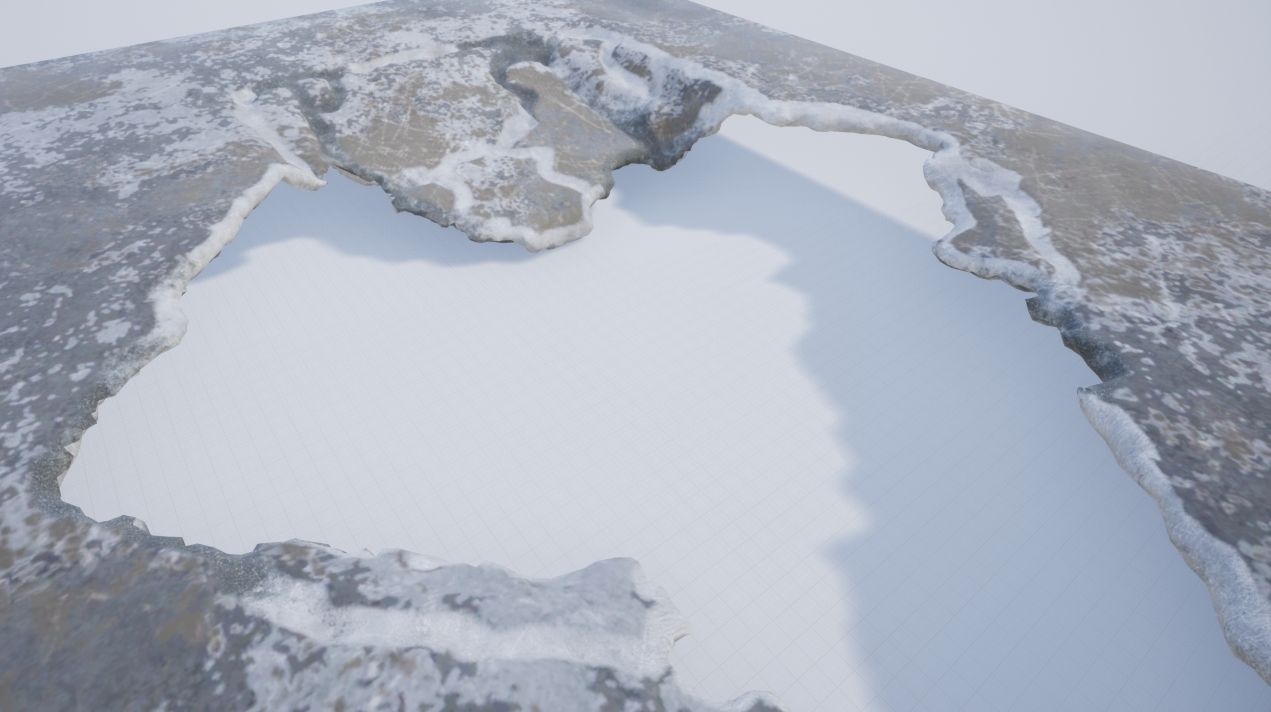
THE ROOF
The roof was something that took a little bit of time, this was something that I had done and redone a good few amount of times. I firstly started off by thinking that if I baked the material on and then vertex painted on the detail I wanted from the bake that I could use a mask to mask out the damaged areas so I could use a tileable on it and have a change of material. It ended up looking terrible shown in the image below but the process learnt helped me understand how complex vertex painting works and how I could use it in the future.
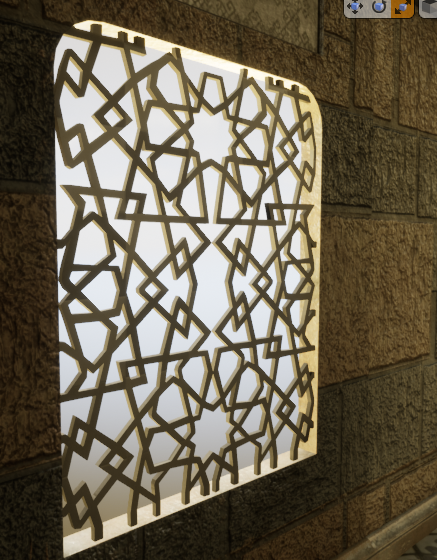
The Window Blockout
I chose to do two ways of doing the window, one alpha and one mesh. The first mesh wouldn't allow the light to transfer through, I realized the holes I made in the mesh wouldn't work. I then said previous I tried to make a alpha that would work and make it double sided, the issue with this is that I couldn't get the light to intersect with the alpha the way I wanted, it kept coming out either low resolution or not at all. I tried up-scaling the light resolution, adding more geometry and playing around with the blending modes but nothing would work. I decided to scrap this idea, not only because the alpha didn't look the way I wanted but also if I was going to attempt to fix this it'll cost more time to do rather than creating the geometry. Either way I decided to change out the meshes, here are both of them shown below.
Alpha Card:
Geo Mesh:
Level Sequencer
My level sequencer when being made would sometimes randomly do a 360. This meaning the camera doing a fast motion sick 360 randomly, I know the fix for this would be something to do with the transformation but for some reason even on a straight line this was occurring. The way I went about fixing this was by changing the transform 1 frame in front of the sequencer to match that of the next transform making it one frame 360 and that when exported out I could then remove that single frame and render the sequence together and miss one single frame which wouldn't be noticeable.

Height of the scene
During my feedback it was recommended to me to increase the height of the scene, by doing this I would create more atmosphere of a rich middle eastern man. The good thing about this was it's very easy because everything is modular and the textures can be tiled to achieve the look. Shamefully when doing it everything seemed too large, almost as if it wasn't realistic and from the feedback from Kemal it was stated that the size of everything was appropriate. I appreciate everyone giving feedback to me for my scene but for the moment I wont be upholding this. At the time I thought this was a brilliant idea but when putting it into practice my mind changed abruptly.
No comments:
Post a Comment