As for play testing we didn't really get much time to properly get it tested aside from one or two occasions. This meaning that our own feedback and play testing would be the soul feedback for most of the project. We got it play tested on one occasion and people were saying the AI were too difficult which was quiet a simple fix for Lewis and as for the environment and textures there was nothing but compliments and appraisal. During this play testing time I really didn't need much in terms of what to do or how the game should look as the lecturer Stephen managed to stay on top of this along with other groups giving feedback during the presentation sessions. This meaning my work would souly be referenced from this as well as most of my feedback would come into play from these sessions making them my full priority for the short period of time that they are.
Aside from this the other time we had it play tested I wasn't available as it was the one time I spent time away from the project. This meaning I asked the group for feedback and no one said there was anything to do with textures, particles or the props so I imagine it was all good news. Saying this I wish we had it play tested one more time before hand in but we were strapped for time as far as the eye could see so these 2 opportunities should have been valued more. Either way this is a lesson learnt for next time so I would say that the game seems to be good and ready for hand in. There isn't much else to write about for this aside from it went well and the feedback I personally received was significant in comparison to the other team members.
Wednesday, 9 May 2018
Interchange - VR
When interchange happened I decided to sign up to the Virtual Reality course. The reason for this is that it closely relates to my own level of production and also I wanted to know how they develop and create environments for VR. This being said, it wasn't quiet what I imagined in a sense of looking to develop my environment skills in that area but instead it was more 'play with the VR and see how fun it is'. Almost trying to sell the thing to us, I then kind of ignored the fact they were trying to sell us the VR instead I was asking the questions I wanted to know such as how they create the software and how the developers use the software to create 3D models and games for the VR.
Shamefully this experience for me wasn't as good as I thought it was but it made me realize that I chose the right course being game design rather than anything to do with VR. I'd personally say that it was interesting enough to keep me there but I could easily have looked these things up on Google in 10 minutes rather than a 30 minute lecture/play test. Don't get me wrong it was nice using the equipment but next time I'll choose something that is more closely relating to what I want or even something that isn't and learn a new skill. Shamefully on this case I wasted it and regret my decisions.
Shamefully this experience for me wasn't as good as I thought it was but it made me realize that I chose the right course being game design rather than anything to do with VR. I'd personally say that it was interesting enough to keep me there but I could easily have looked these things up on Google in 10 minutes rather than a 30 minute lecture/play test. Don't get me wrong it was nice using the equipment but next time I'll choose something that is more closely relating to what I want or even something that isn't and learn a new skill. Shamefully on this case I wasted it and regret my decisions.
Sunday, 6 May 2018
BA2B - The End - Week 8
This is the final week of our project so not much is going to be in this aside from the few bits mentioned previously. The stairs texture is now complete, the game is now built and ready to be played and everything I've been given to do/texture is completed. I'd personally like to thank my team for everything they've done and accomplished over this period as it hasn't been easy because of how high we aimed and how high we achieved may I also say. Although this game has still got a long way to go showing what we can do in 8 weeks has made me think that we can do anything in 8 weeks aside from completely finishing a game. Although we set ourselves a impossible task the game as a whole is great, everything works to what it should and it looks amazing. Given more time maybe say 10 weeks we would have had this game completed and ready to be tested for a alpha stage.
Overall I believe the team worked astoundingly achieving what we all thought at first to be somewhat impossible. Proving that pushing the team as a manager and pushing everyone to their best capabilities I believe the team I threw together (not taking all credit but I knew every ones abilities) was one of the best that could be formed within our year group because we all share the same style and workflow. Although some things didn't get finished again my fault on that not pushing everyone to do what they must, I believe the outcome and overall standing of the team is happy and head high on this as it's a amazing project and we all deserve to give each other a pat on the back. Through out this we were trying to request a lot of help from lecturers but instead they were to help the 3rd years so we were mainly left on our own to create this project and because of this a little bit more sense of achievement has come from this all. Knowing that we can all research what we need to do and exactly where to look held none of us back. Even if it meant just asking another team member or going to Google for certain results it helped massively. I couldn't have asked for a better team to work with, in hopes we work together again would be a treat.
As for a personal review, I believe I done well enough to get the game looking and feeling. My overall job in this role was to give the game feel and immersion by creating all of the textures small props and particle effects. I done this by creating my textures accordingly by doing them half life-like but also some to be a little less because of the graphics being too heavy then and bringing down the FPS. Aside from this the props made were small and simple but acted as 'fillers' for rooms and corridors to enable the player to be more immersed than what it would be on a empty hallway. The bad thing about this was my beginner weeks were just filled with creating 'textures' that may or may not go into the game as well as some props. This meant that not so much I had to wait for the environmental artist to give me instructions but I wasn't able to help out as much as I wanted in the first coming weeks so I decided to take on the role as team manager knowing this was going to be the case. As team manager I wanted everyone's roles to be precise and exactly what they wanted to do, I then thought to myself what I would need for this level of game I (and the team) wanted to create, knowing everyone helped so that way I had 2 blue printers (one with level design knowledge and one with zbrush knowledge) 1 environmental designer (with blueprint and 3d knowledge) 1 character artist and 1 asset artist and then me with environment design, texture and 3D knowledge I knew that if someone was to get stuck in a hole we can drag them back out of it. Whether it be lack of work or being stuck and giving them the solution.
In the end the game as a whole was exactly what I wanted and the team worked perfectly in-sync like I had hoped. I believe this project was a complete success and everyone of our team learnt new things everyday. If I was to do the project again I'd choose the same people.
Now it's time for me to get everyone ready for hand-in. This will be my last post before hand in because of how hectic it's going to be.
BA2B - The Big Post - Week 6&7 - Inc. Miscellaneous
Because the last two weeks have been so hectic in terms of getting work done, I've decided to mash the two weeks together in these posts. This is due to having my work load over amounted and also my schedule being busy as hell with life situations (like everyone else has). This will mainly be a progress report and screenshots to showcase everything I've done in the last two weeks. Some things will be explained if they haven't been explained before but as for now I'll just showcase most of my work.
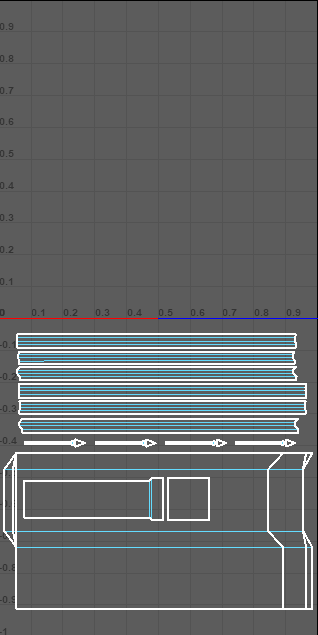
Starting off I'll show you the way I've decided to UV map my staircase because I'm using the color ID to let me texture it properly. All of the UVs are overlapped but because of the color ID I can set it so the texture will only go on certain colors. Shown below is a example of this.
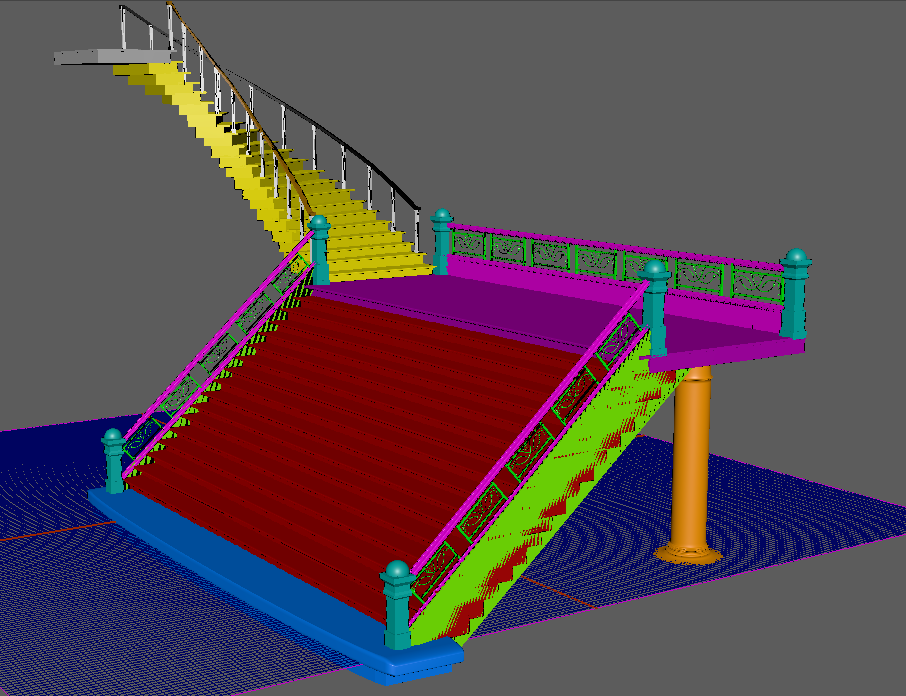
Now that I have these setup, I wanted to place them on their own layers to make sure all the UVs were correct and color co-ordinated to the object itself. This was simple yet it makes the workflow 10x faster when looking at it from a textures point of view, although I'm going to be texturing it, it allowed me to make sense of my own workflow. If you were wondering how long this UV layout took me, it was a while due to the small details placed on the object but once those were completed it took little to no time.
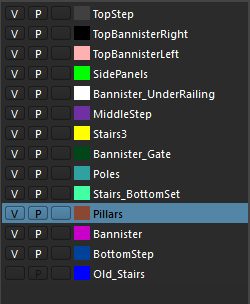
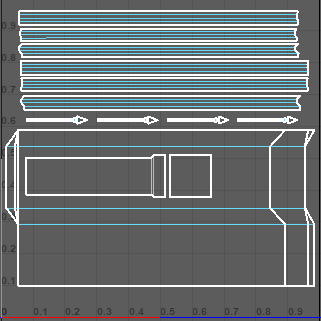
As for this, look at this beautiful mess that I'll try to explain.
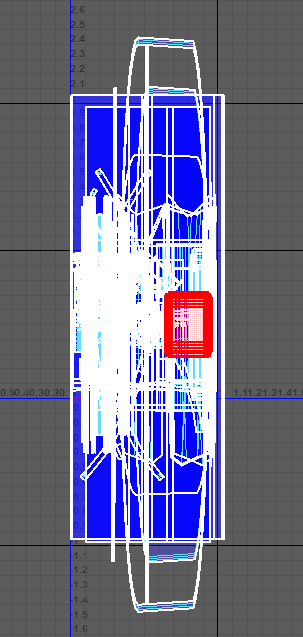
The layout is simple, color ID maps allow me to pick the object I want to texture in other programs and all of these overlap for this exact reason. Aside from this, the objects that stretch outside of the box will allow for the texture to be repeated onto itself, this meaning that it will save on the levels of detail needed and not needing to put it on its own texture sheet. I'll show off one objects in the scene below so you get the understanding of what I mean. This pillar is a good example as it is layered properly and has one piece outside the boundary box.
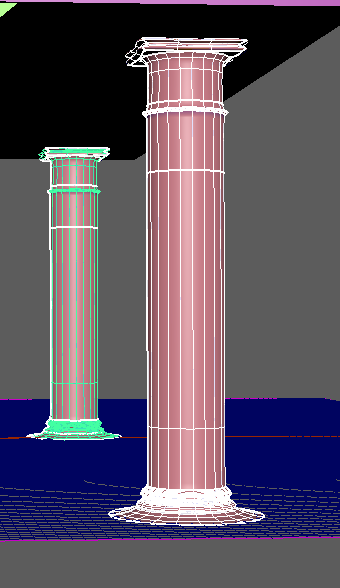

The pillar itself uses a orange color tint so it can be depicted otherwise by the programs I'm going to be putting it in. This can be selected separate from all the other colors allowing for a separate texture as well as its own UV layout so that it can be textured properly. The reason I let it go outside of the UV boundary box is because the texture can happily repeat itself on the overall cylinder because it's a easy repeatable. I've spent a good amount of time working to get this right allowing for perfect precise UV layouts and seam placements as well as getting it ready for a perfect texture. I will be texturing this at the beginning of week 8 with the help of some other team mates for feedback. As for now I am going to leave 3D to the 3D artists and continue working on my textures for the game as they're top priority for me right now, then particle effects and lastly if needs be returning to 3D.
This week I was given a list of textures needed to make the game look and feel more realistic. The reason I was forced to do so much was because all of the 3D assets finally came flooding through as well as the environmental textures. This was my list from the environmental artist:
- Fence (if you can get it to work)
- Stairs
- Cathedral Roof texture
- Courtyard Roof texture (i need to fix up uvs)
- Courtyard Cracked stone texture w/ moss & dirt
- Cathedral Ceiling texture (Color changes possibly)
This list was small from the environmental artist because I've done most of the work already, this was the last thing sent my way from him as once these are completed we've completed the environment texture wise. Then from there I'll move onto the assets. The beginning was the fence, a piece given to me as a FBX with the wrong UV set. I had to firstly go in and move the UV set as the person who done it managed to forget to do this because of the stress we're all under I imagine. No idea how this happened, but I just moved the UVs up and fixed it that way. This wasted minimal time so there was no need to bring it up as it's kinda a simple mistake, simple fix. After this I just need to set the pivot points and get it in game. Then later I'll add the texture in.
I then thought to myself that the texturing for this could be really simple, in fact the textures I've already made could be used on this and manipulated to make it look better. Using both the metal scratched and the fractal textures I then used a base concrete material under these to create a worn and gate looking feel whilst manipulating the colors to give off the feel of the game itself and the color scheme we're following. Shown below is the piece that we were encountering issues with. This was the original one before with the bad UVs just using my basic textures to create this, then once fixed is the image below this one.

Ignoring the stairs for now, the next thing on the list was the roof texture. This was quiet simple as it's just a tile generation manipulation. The way I done this was creating a almost 'shadow' effect on top of the tiles to make it look like there's some level of shadow on the tiles as well as dirt/mold.
The reason for it being this way with the cracks as well as the dark obvious parts is because it will be a roof tile at around 1k or even 512 texture resolution as the player wont be able to go up to it closely and see. Saving on both GPU memory and processing memory this will let the engine run smoother than if it was higher especially with the amount of it being used. I made two variations of this but the first one will be primarily used and the second one on any low-bearing rooftops because less detail is needed on those as you probably wont be able to get high enough to see them.
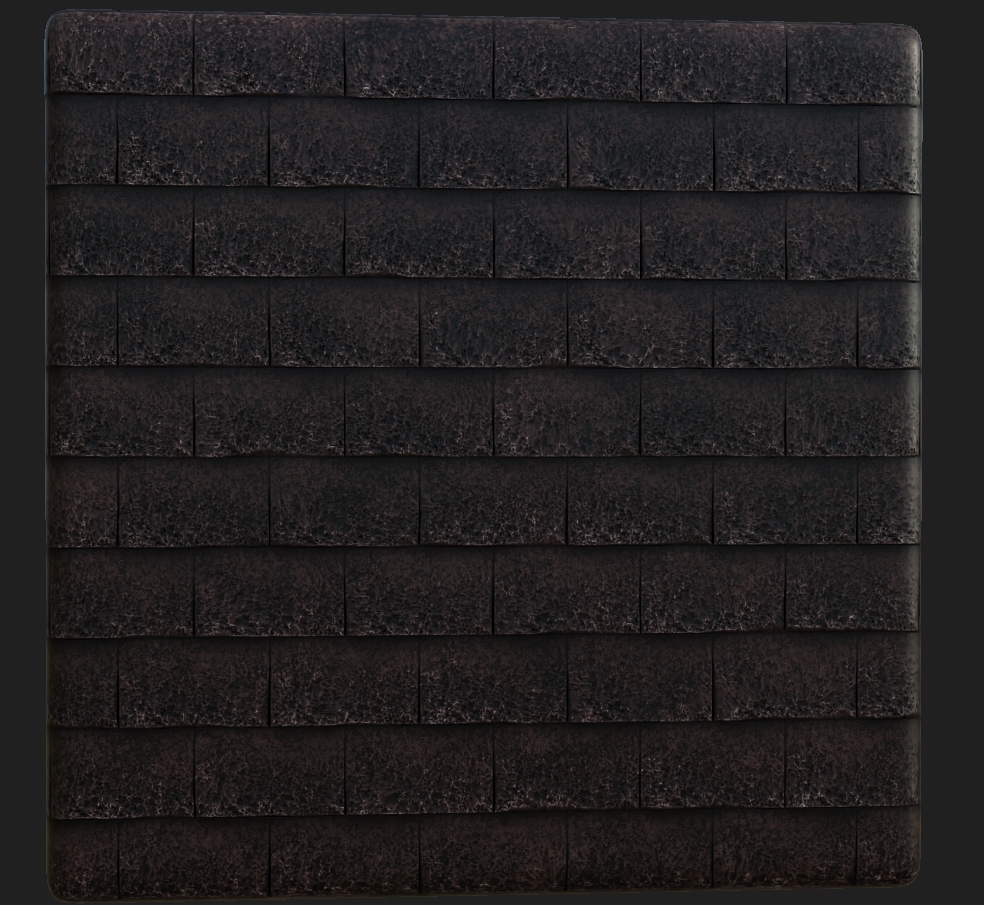
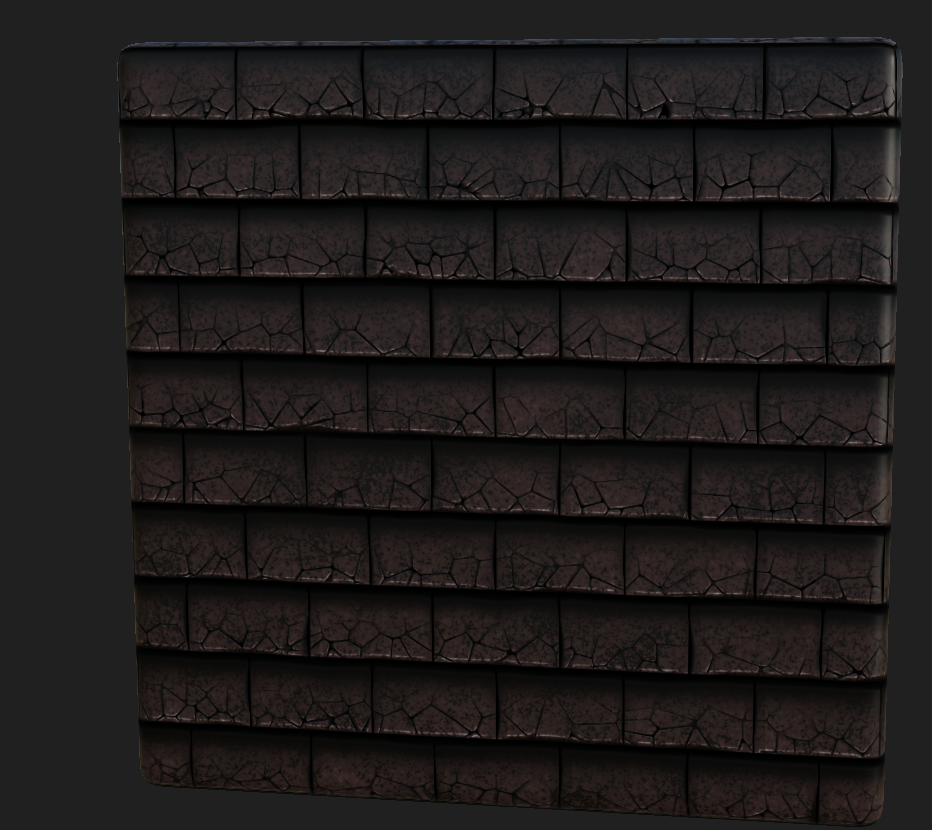
Although these tiles are basic they don't need to be adventurous like the other textures as these wont be looked at much and I want to try and take away attention from the roof due to the player having to concentrate on the game play at hand. Moving on from this as there's not much to talk about as it's just tile generation manipulation I was then asked to make a cracked floor with moss and dirt. This was something I've previously looked at but not had that big of a idea on how to create it. Here's my attempt shown below.
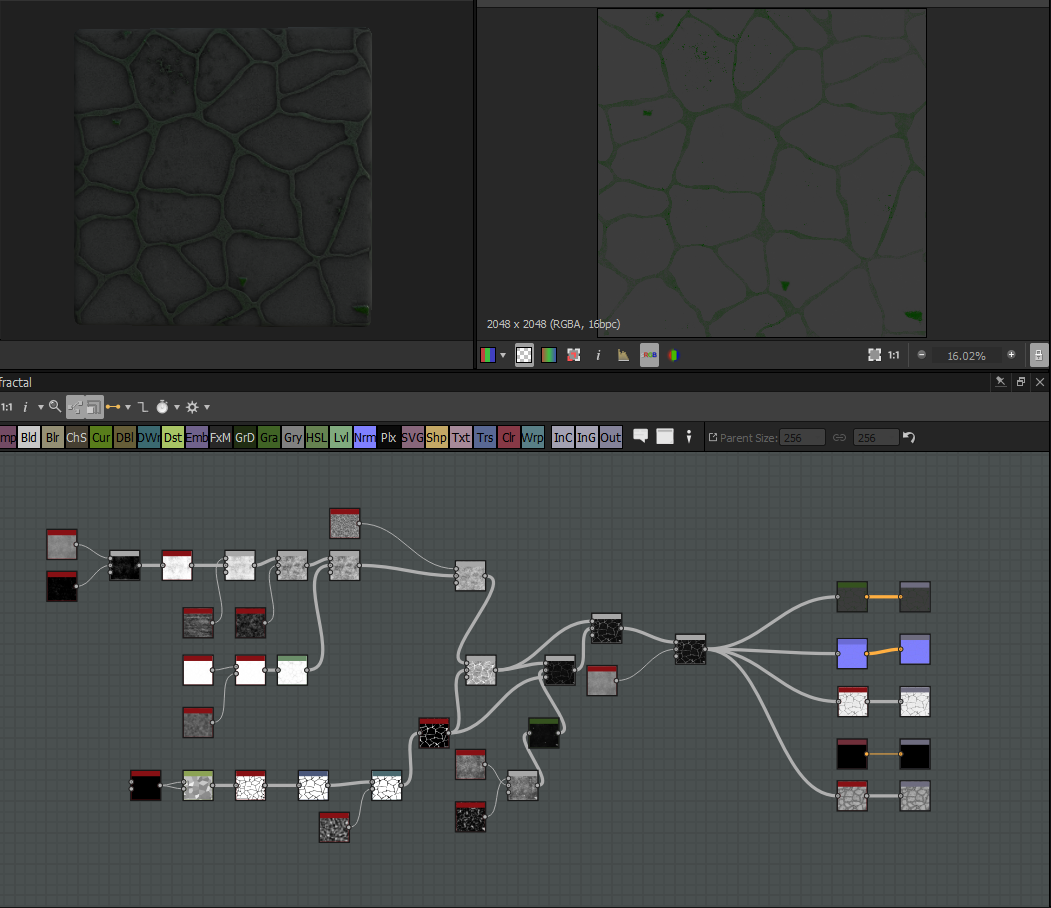
This was a basic version of it due to just working out how to create the texture, I then needed to head to sleep due to falling asleep at the PC so I gave it to the environmental artist Derv and had him finish it off and below is a image of the texture he sent me which is now used in game. We both worked on this together he just finished it off for me whilst I slept. This is the sort of team work me and the environmental artist had all the way through working on this project as we needed to closely work together to get the result we wanted.

After this the final piece on the environmental list was the color change of the roof tile. I believe we ended up changing it as the red worked with the lights perfectly (as I thought) but took away the eyes from the actual game play. Don't get me wrong it'll fit the theme but not the references I was using (normal mosaic pieces on roofs). This was everything done from the environmental artist now onto my own work for the game that I wanted to try and add in.
Before moving onto more asset texturing I wanted to showcase some of the things I've been doing to create more atmospheric feelings and engrossing the player more. Firstly with the particle effects I created previously I wanted to add a little bit extra something into them to make them stand out more as well as give off more of a feel of whether they're good or bad.
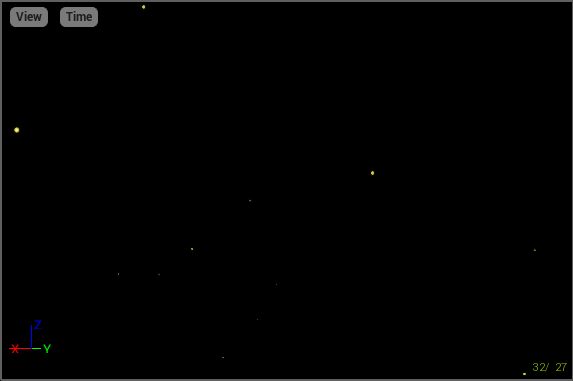
With the dark particle effect I decided to add in more of a 'spitting' effect that shows the dead AIs soul is flying out in pain rather than nicely. Showing that if you want them to go to hell you kill them in the dark. I've done almost the same with the light but instead changed it slightly.
Gif of dark particle effect - https://gyazo.com/a2e392698ea5cca6a273be1d0b253cd5
Sorry for the poor quality, you can see it all better in hopes in-game.
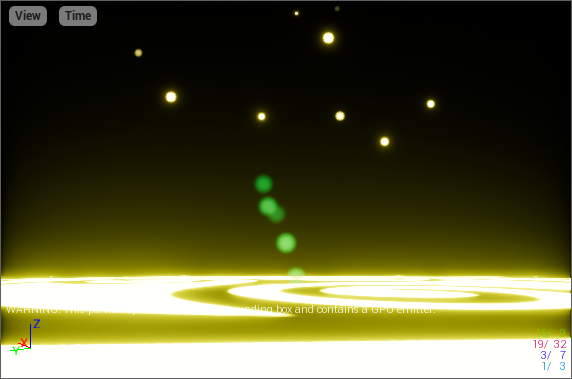
The light I've almost done the same, instead it's more of a angelic type pouring out of the dead body. It's almost like the good is seeping out instead or flying out. Shown by the JPEG as the green bubbles and in the Gif it's hard to notice but again, in-game it's fine.
Gif Light particle effect - https://gyazo.com/c22b08ab2765174afc2eb823982150a5
Lastly I wanted to create some level of atmosphere for the courtyard and by doing this I thought what else is there that normally sits outside doing nothing but being a annoyance during the night. I thought of fireflies seeing as it's meant to be a damp and grotty area. I decided to make these very simplistically in the particle effect maker by just making a dot and having them have a sort life span so hopefully no one in game will notice that they're small and just a circle. Shown below is a image and gif of them.
Gif fireflies - https://gyazo.com/3fe5755e21dde9b51971e7b1ecd838ad
This was all from the particle effect side of things, I wanted to create a candle esk effect but the one I had made in a previous project for my college work may have been enough. Below is a image and gif of that. It only sways side to side but I doubt we are in need of more than that.
Gif candle - https://gyazo.com/9414c8db0116452778f93ac9861498a8

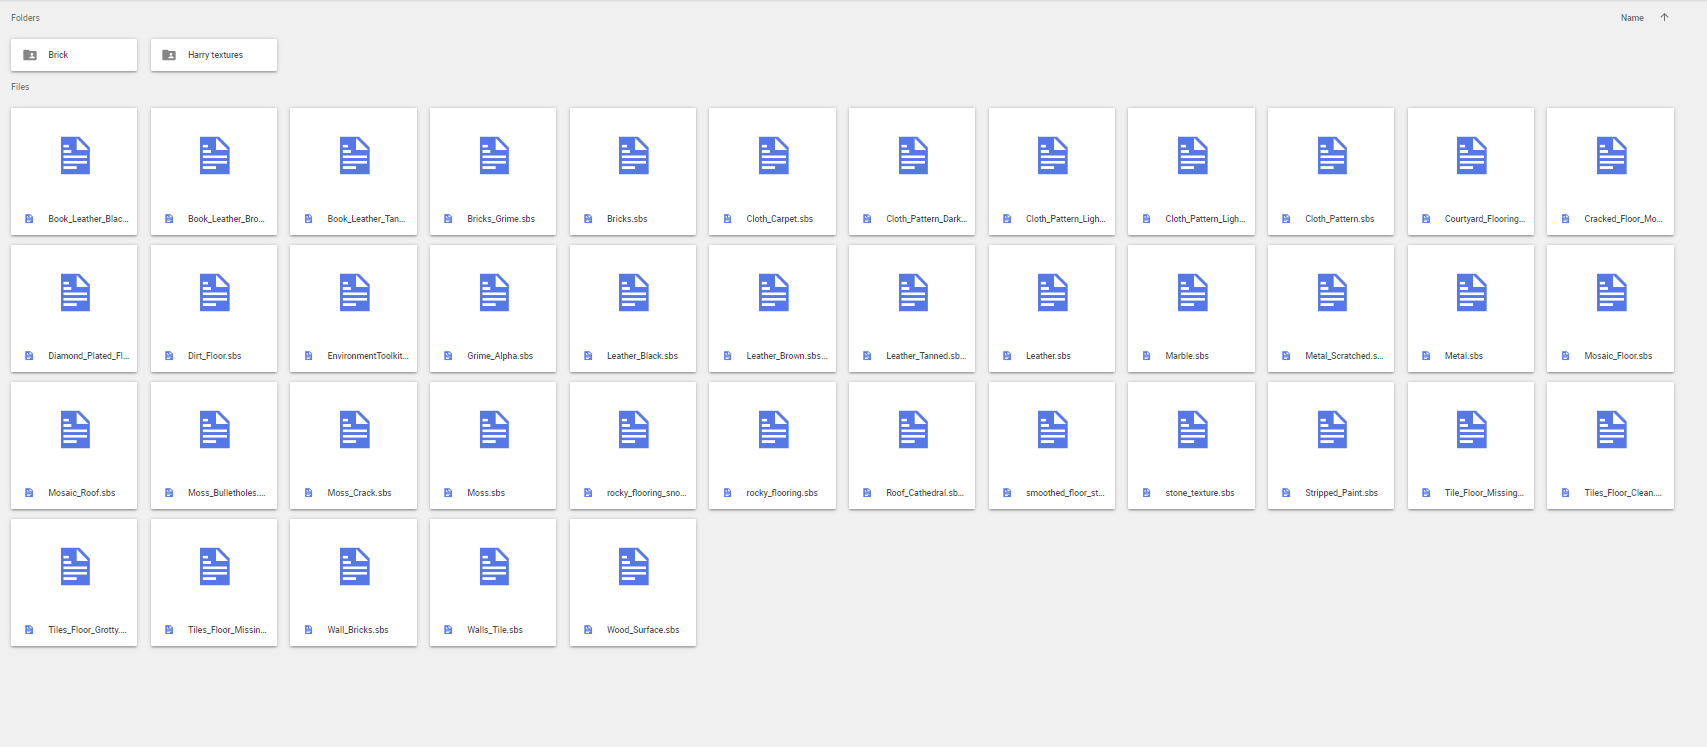
Back to the texturing side of things, after taking a small break from it I decided to get on and help others with their texturing (I wasn't doing all of it for some reason but anyway) the 3D artists decided instead of doing 3D they'd give texturing a go. I tried to help them out by uploading all of my textures made for this project onto the Google Drive shown below. If they chose to use them or not was up to them but I wanted to help as much as I could throughout these two weeks. Especially because I was so busy with the stairs at one point. Modelling them for a while and getting that perfect then moving onto the UV layout of them and such took its toll.
After realizing most of the 3D artists instead wanted to use smart materials I needed to get myself out of their way as that way caused me to have to reference the materials and not be able to showcase all of mine. This was a inconvenience but I wanted to let them do what they wanted. If we were to upload this game anywhere I would redo all of their textures to make sure it fit into the legit scheme of things and not cause copy-right issues. This was primarily what I had done during these two weeks aside from changing some of my materials to match what people wanted etc. I also helped Harry this week by giving him the exact textures he needed for his catacombs so in hopes that's all finished, I am yet to receive anything from him so I would imagine he has it all done. I will check up on him before hand to ensure he has the catacombs completed and textured correctly.
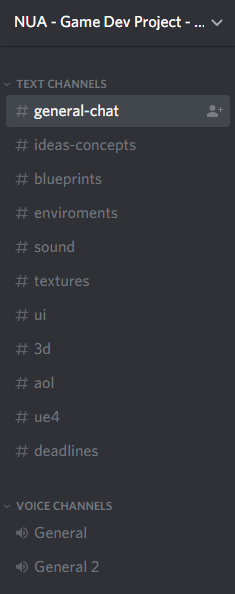
Miscellaneous things such as communications and data management we used programs like discord, google drive and more. The image below refers to all of the programs used for this type of work. I'll try to showcase how we micro-managed everything.

After getting all of these setup, we then went in and defined who needed to work where and how the layout should be. Shown below are examples of this including our text channels and file management.

These are just two ways we done it, for others such as Dropbox we used just uploads as Google Drive wasn't available. The trello board I would like to say it'd help but instead it was just a way of us giving out tasks and not so much used for the way it was meant. Either way I'd say it helped with the project but overall it was more of a way of us communicating what tasks we need to do and references for our work. I'd say it was good alongside my time-management document which I will now run through in a short brief explanation.
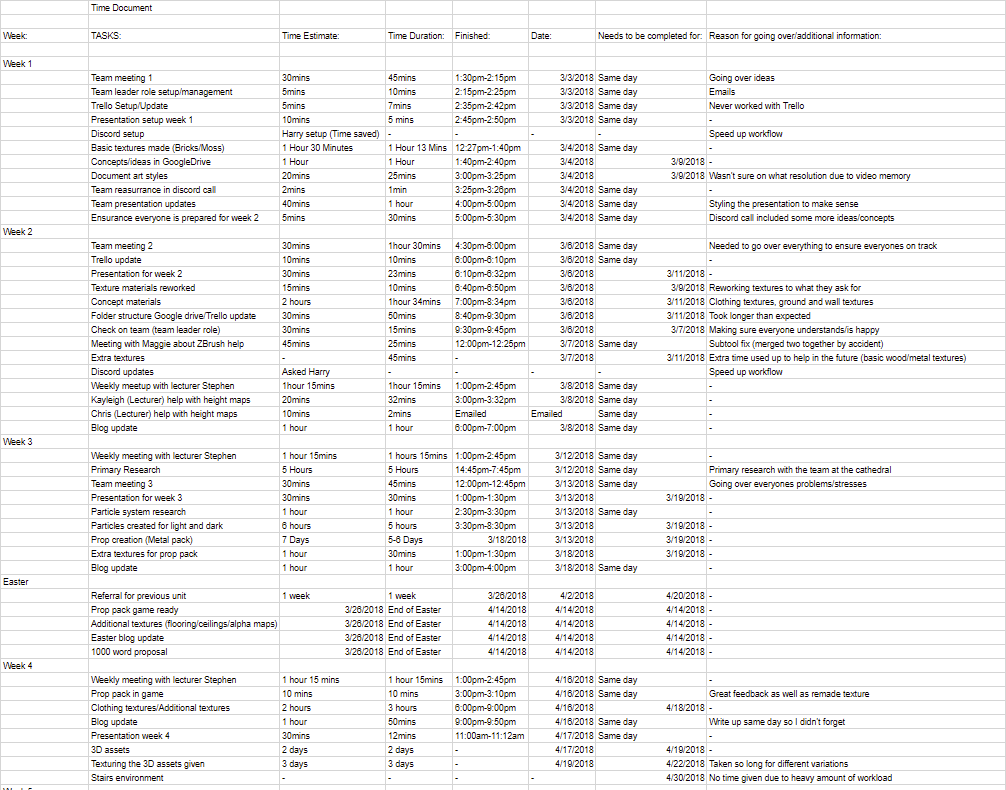
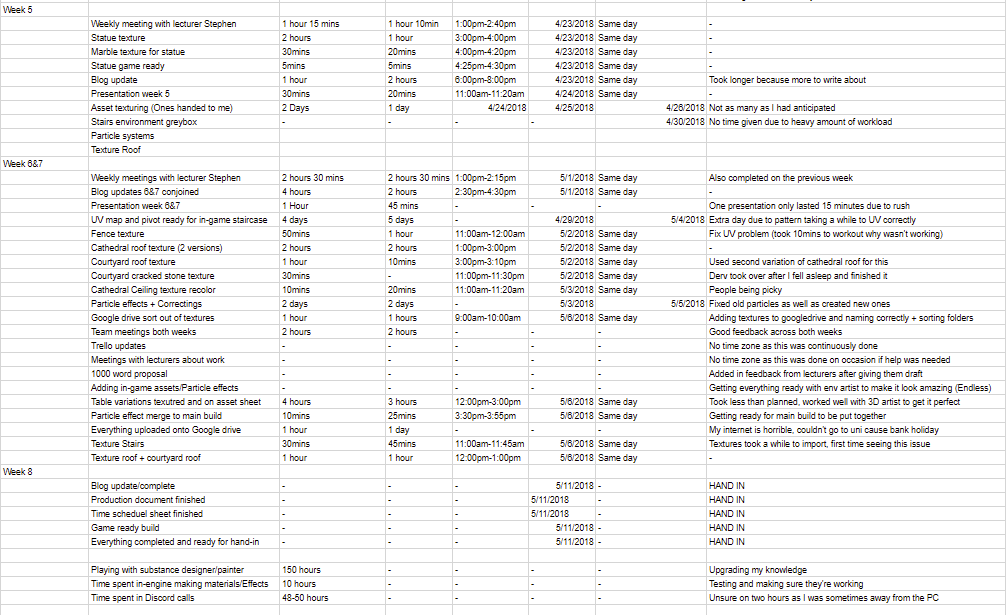
This basic time document include most of the hours I remembered to jot down, including all of my progression throughout the main textures/assets I done as well as meetings, uni time and time spent on getting everything ready is also included and then miscellaneous is kept to minimal amounts such as time spent in uni with lecturers and meetings/emails with lecturers. It kinda speaks for itself but as you can imagine it all worked out in the end in relation to keeping track of time. I am going to be honest as say not everything is here but I put down what I can remember working on the days and towards the end left a overall estimate of time on the programs I used during this term.
Starting off I'll show you the way I've decided to UV map my staircase because I'm using the color ID to let me texture it properly. All of the UVs are overlapped but because of the color ID I can set it so the texture will only go on certain colors. Shown below is a example of this.
Now that I have these setup, I wanted to place them on their own layers to make sure all the UVs were correct and color co-ordinated to the object itself. This was simple yet it makes the workflow 10x faster when looking at it from a textures point of view, although I'm going to be texturing it, it allowed me to make sense of my own workflow. If you were wondering how long this UV layout took me, it was a while due to the small details placed on the object but once those were completed it took little to no time.
As for this, look at this beautiful mess that I'll try to explain.
The layout is simple, color ID maps allow me to pick the object I want to texture in other programs and all of these overlap for this exact reason. Aside from this, the objects that stretch outside of the box will allow for the texture to be repeated onto itself, this meaning that it will save on the levels of detail needed and not needing to put it on its own texture sheet. I'll show off one objects in the scene below so you get the understanding of what I mean. This pillar is a good example as it is layered properly and has one piece outside the boundary box.
The pillar itself uses a orange color tint so it can be depicted otherwise by the programs I'm going to be putting it in. This can be selected separate from all the other colors allowing for a separate texture as well as its own UV layout so that it can be textured properly. The reason I let it go outside of the UV boundary box is because the texture can happily repeat itself on the overall cylinder because it's a easy repeatable. I've spent a good amount of time working to get this right allowing for perfect precise UV layouts and seam placements as well as getting it ready for a perfect texture. I will be texturing this at the beginning of week 8 with the help of some other team mates for feedback. As for now I am going to leave 3D to the 3D artists and continue working on my textures for the game as they're top priority for me right now, then particle effects and lastly if needs be returning to 3D.
This week I was given a list of textures needed to make the game look and feel more realistic. The reason I was forced to do so much was because all of the 3D assets finally came flooding through as well as the environmental textures. This was my list from the environmental artist:
- Fence (if you can get it to work)
- Stairs
- Cathedral Roof texture
- Courtyard Roof texture (i need to fix up uvs)
- Courtyard Cracked stone texture w/ moss & dirt
- Cathedral Ceiling texture (Color changes possibly)
This list was small from the environmental artist because I've done most of the work already, this was the last thing sent my way from him as once these are completed we've completed the environment texture wise. Then from there I'll move onto the assets. The beginning was the fence, a piece given to me as a FBX with the wrong UV set. I had to firstly go in and move the UV set as the person who done it managed to forget to do this because of the stress we're all under I imagine. No idea how this happened, but I just moved the UVs up and fixed it that way. This wasted minimal time so there was no need to bring it up as it's kinda a simple mistake, simple fix. After this I just need to set the pivot points and get it in game. Then later I'll add the texture in.
I then thought to myself that the texturing for this could be really simple, in fact the textures I've already made could be used on this and manipulated to make it look better. Using both the metal scratched and the fractal textures I then used a base concrete material under these to create a worn and gate looking feel whilst manipulating the colors to give off the feel of the game itself and the color scheme we're following. Shown below is the piece that we were encountering issues with. This was the original one before with the bad UVs just using my basic textures to create this, then once fixed is the image below this one.
Ignoring the stairs for now, the next thing on the list was the roof texture. This was quiet simple as it's just a tile generation manipulation. The way I done this was creating a almost 'shadow' effect on top of the tiles to make it look like there's some level of shadow on the tiles as well as dirt/mold.
The reason for it being this way with the cracks as well as the dark obvious parts is because it will be a roof tile at around 1k or even 512 texture resolution as the player wont be able to go up to it closely and see. Saving on both GPU memory and processing memory this will let the engine run smoother than if it was higher especially with the amount of it being used. I made two variations of this but the first one will be primarily used and the second one on any low-bearing rooftops because less detail is needed on those as you probably wont be able to get high enough to see them.
Although these tiles are basic they don't need to be adventurous like the other textures as these wont be looked at much and I want to try and take away attention from the roof due to the player having to concentrate on the game play at hand. Moving on from this as there's not much to talk about as it's just tile generation manipulation I was then asked to make a cracked floor with moss and dirt. This was something I've previously looked at but not had that big of a idea on how to create it. Here's my attempt shown below.
This was a basic version of it due to just working out how to create the texture, I then needed to head to sleep due to falling asleep at the PC so I gave it to the environmental artist Derv and had him finish it off and below is a image of the texture he sent me which is now used in game. We both worked on this together he just finished it off for me whilst I slept. This is the sort of team work me and the environmental artist had all the way through working on this project as we needed to closely work together to get the result we wanted.
After this the final piece on the environmental list was the color change of the roof tile. I believe we ended up changing it as the red worked with the lights perfectly (as I thought) but took away the eyes from the actual game play. Don't get me wrong it'll fit the theme but not the references I was using (normal mosaic pieces on roofs). This was everything done from the environmental artist now onto my own work for the game that I wanted to try and add in.
Before moving onto more asset texturing I wanted to showcase some of the things I've been doing to create more atmospheric feelings and engrossing the player more. Firstly with the particle effects I created previously I wanted to add a little bit extra something into them to make them stand out more as well as give off more of a feel of whether they're good or bad.
With the dark particle effect I decided to add in more of a 'spitting' effect that shows the dead AIs soul is flying out in pain rather than nicely. Showing that if you want them to go to hell you kill them in the dark. I've done almost the same with the light but instead changed it slightly.
Gif of dark particle effect - https://gyazo.com/a2e392698ea5cca6a273be1d0b253cd5
Sorry for the poor quality, you can see it all better in hopes in-game.
The light I've almost done the same, instead it's more of a angelic type pouring out of the dead body. It's almost like the good is seeping out instead or flying out. Shown by the JPEG as the green bubbles and in the Gif it's hard to notice but again, in-game it's fine.
Gif Light particle effect - https://gyazo.com/c22b08ab2765174afc2eb823982150a5
Lastly I wanted to create some level of atmosphere for the courtyard and by doing this I thought what else is there that normally sits outside doing nothing but being a annoyance during the night. I thought of fireflies seeing as it's meant to be a damp and grotty area. I decided to make these very simplistically in the particle effect maker by just making a dot and having them have a sort life span so hopefully no one in game will notice that they're small and just a circle. Shown below is a image and gif of them.
Gif fireflies - https://gyazo.com/3fe5755e21dde9b51971e7b1ecd838ad
This was all from the particle effect side of things, I wanted to create a candle esk effect but the one I had made in a previous project for my college work may have been enough. Below is a image and gif of that. It only sways side to side but I doubt we are in need of more than that.
Gif candle - https://gyazo.com/9414c8db0116452778f93ac9861498a8
Back to the texturing side of things, after taking a small break from it I decided to get on and help others with their texturing (I wasn't doing all of it for some reason but anyway) the 3D artists decided instead of doing 3D they'd give texturing a go. I tried to help them out by uploading all of my textures made for this project onto the Google Drive shown below. If they chose to use them or not was up to them but I wanted to help as much as I could throughout these two weeks. Especially because I was so busy with the stairs at one point. Modelling them for a while and getting that perfect then moving onto the UV layout of them and such took its toll.
After realizing most of the 3D artists instead wanted to use smart materials I needed to get myself out of their way as that way caused me to have to reference the materials and not be able to showcase all of mine. This was a inconvenience but I wanted to let them do what they wanted. If we were to upload this game anywhere I would redo all of their textures to make sure it fit into the legit scheme of things and not cause copy-right issues. This was primarily what I had done during these two weeks aside from changing some of my materials to match what people wanted etc. I also helped Harry this week by giving him the exact textures he needed for his catacombs so in hopes that's all finished, I am yet to receive anything from him so I would imagine he has it all done. I will check up on him before hand to ensure he has the catacombs completed and textured correctly.
Miscellaneous things such as communications and data management we used programs like discord, google drive and more. The image below refers to all of the programs used for this type of work. I'll try to showcase how we micro-managed everything.
After getting all of these setup, we then went in and defined who needed to work where and how the layout should be. Shown below are examples of this including our text channels and file management.
These are just two ways we done it, for others such as Dropbox we used just uploads as Google Drive wasn't available. The trello board I would like to say it'd help but instead it was just a way of us giving out tasks and not so much used for the way it was meant. Either way I'd say it helped with the project but overall it was more of a way of us communicating what tasks we need to do and references for our work. I'd say it was good alongside my time-management document which I will now run through in a short brief explanation.
This basic time document include most of the hours I remembered to jot down, including all of my progression throughout the main textures/assets I done as well as meetings, uni time and time spent on getting everything ready is also included and then miscellaneous is kept to minimal amounts such as time spent in uni with lecturers and meetings/emails with lecturers. It kinda speaks for itself but as you can imagine it all worked out in the end in relation to keeping track of time. I am going to be honest as say not everything is here but I put down what I can remember working on the days and towards the end left a overall estimate of time on the programs I used during this term.
Subscribe to:
Comments (Atom)