Tuesday, 20 November 2018

Week 3/4/5 - Updates

So I managed to get myself caught up in the project. Forgetting about my blog but making minor notes on what I did and how I did them. This write up will include weeks 3, 4 & 5. So starting off I went on a massive roller coaster of feedback, ways to do things and how to go about them with my peers as well as my lecturers. So firstly I decided to update my models, this being everything you've seen before plus more. To start off with I spoke to Ronald Spriggs our anatomy lecturer but he also worked in the metal works industry for many years, he showed me the exact way I should be modelling my railway and the exact dimensions needed. I told him it was going to be based around the American state Missouri and in a dense type forestry area. My first mistake he showcased me was the overall design of the model, firstly I had a square top which was changed to a rounded top shortly after our talk. Shown below is the two images. Along with some other bits like bevels where they needed to be and curvature, not only that but a fixed flat surface on top for the train to ride on.


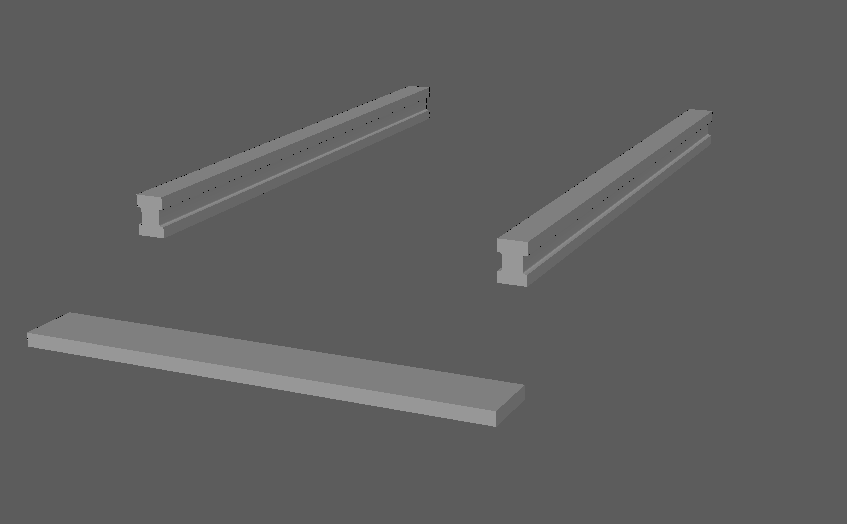
As for the rail being completed, it needed proper UV mapping to allow the texture to form over the whole object as well as the correct repeated pattern to make it look less tiled. The good thing about rust is that it can be tiled but wont ever actually look it unless you really look at the detail. I used the texture sheet method here to create a better workflow and allows for less texture resolution and less performance across the whole project.


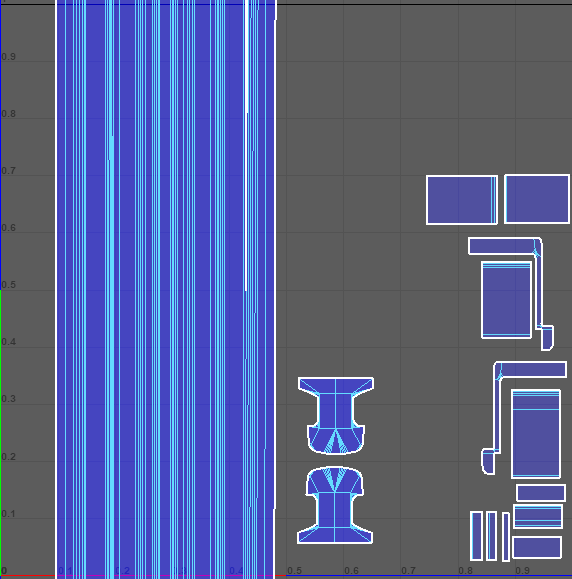
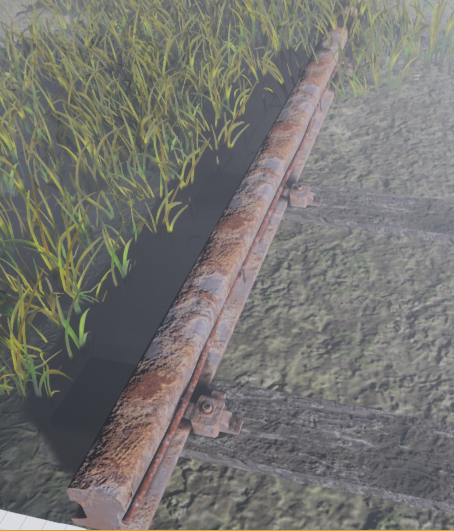
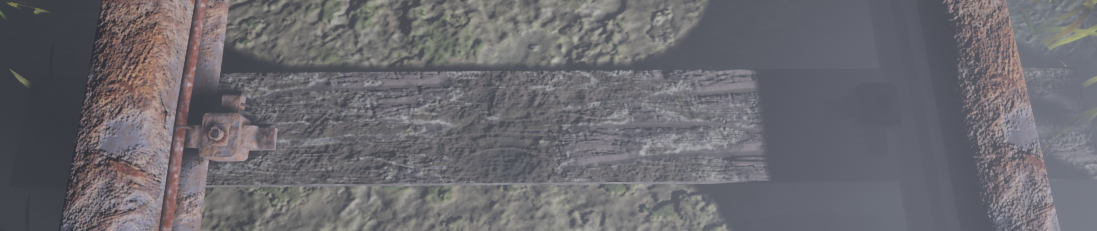
The reason I didn't add on anything else to this sheet was because nothing else needed to use this texture, the texel density for the pin was brought up so that way it matched the rail road allowing the texture to look good on both, although this will cause minor stretching it can be hidden because of the tileable texture. If you were to look at it in engine like the image below (real size of the asset) it has no stretching in terms of horizontally but vertically it has minor stretching but doesn't look bad. If this was a bigger object I would change it immediately but seeing as it's so small there is no need as it's just giving off the impression of itself being there rather than dragging the eye towards it. As for the rail as mentioned before it works perfectly with the material and the overall repetitiveness is left out due to the rust looking different as well as some vegetation will be hiding some of it. That was the rail completed none the less along with the wired pin.


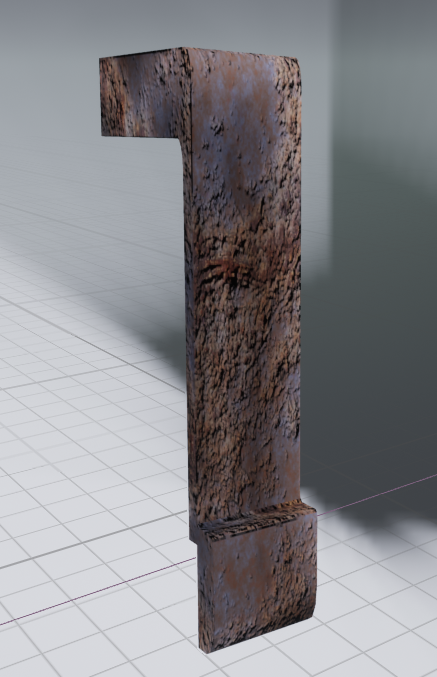
He then told me I needed to add in a 'train stump' or 'holder' which is what holds the track in place onto the wood and earths the track so that way the trains don't cause static electricity on the rails causing build up. He told me that normally there would be a big bolt going straight through the ground and the wood from top to bottom and the something clamping the wood down as well as the rail, this allowing the rail to be earthed. This concept I made up is for a old electrical rail which used wiring to generate electricity for the train. The image shown to the right is my reference image for this as well as overall concept piece I'll be following for my rail. (References at the end of the document).

 Shallow Focus Photo of Train Rail

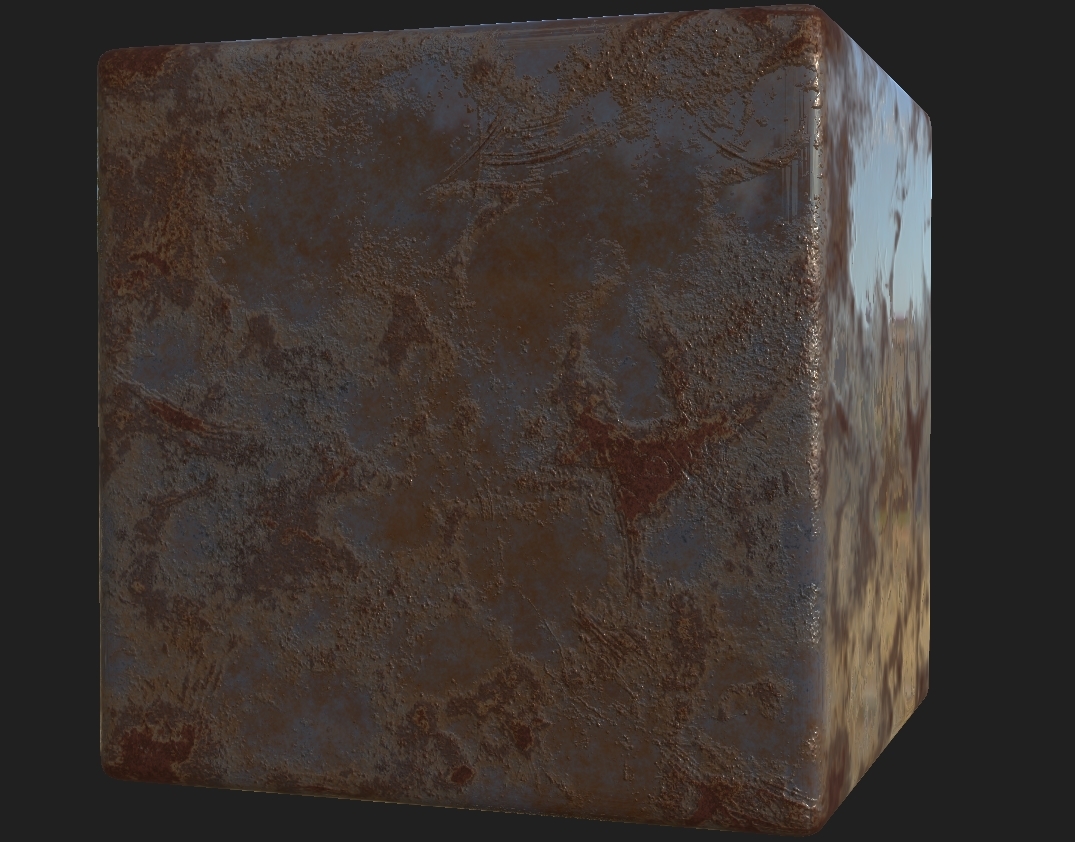
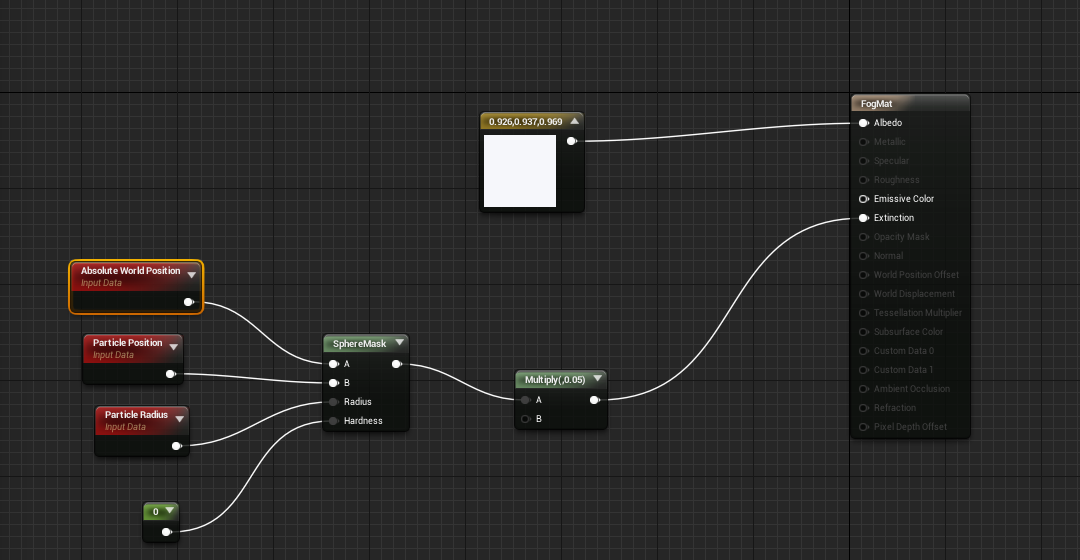
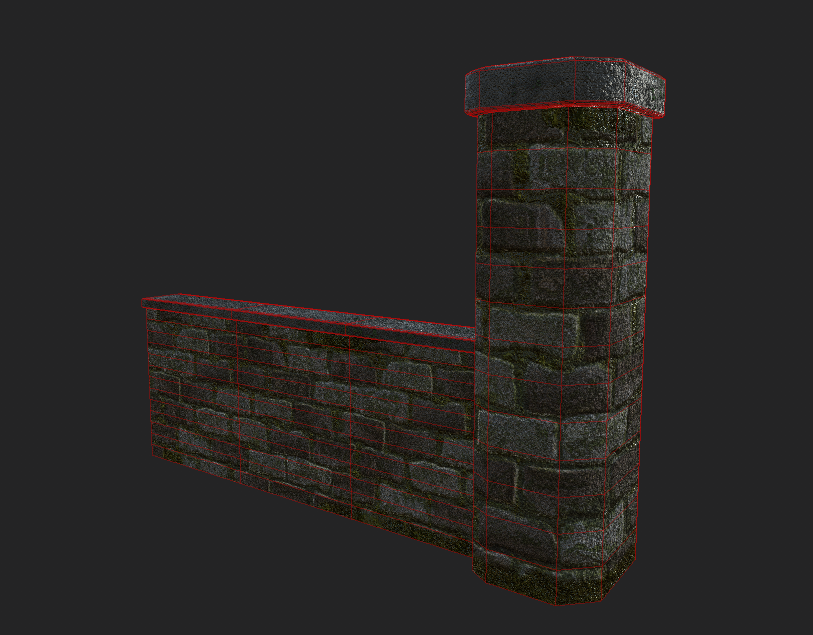
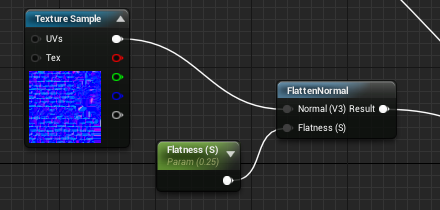
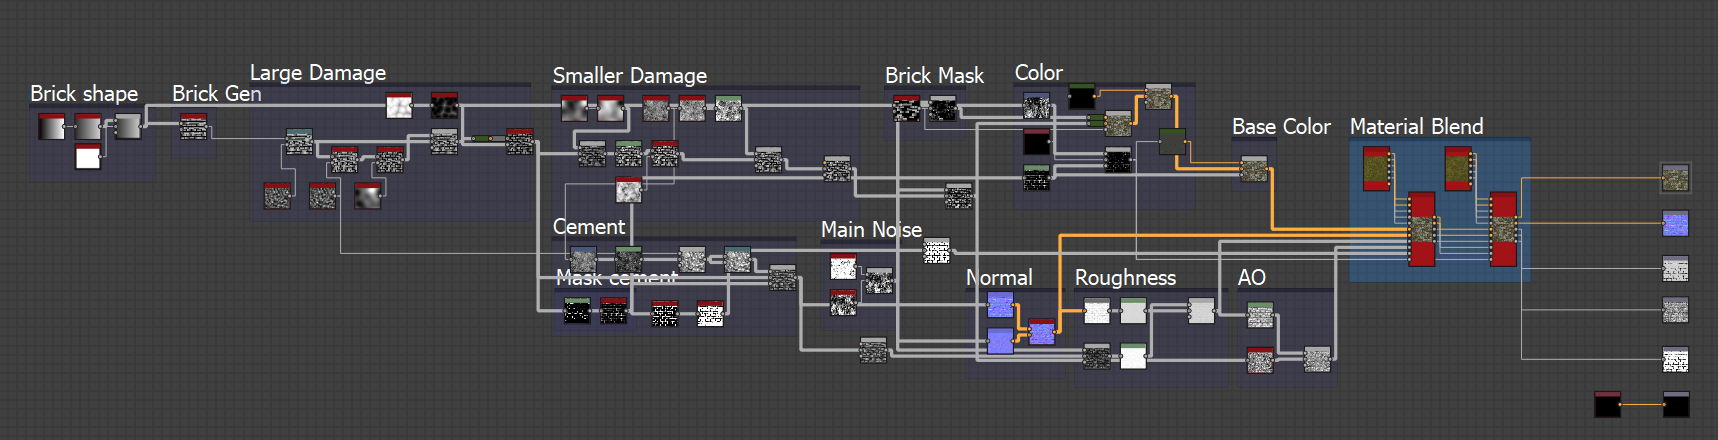
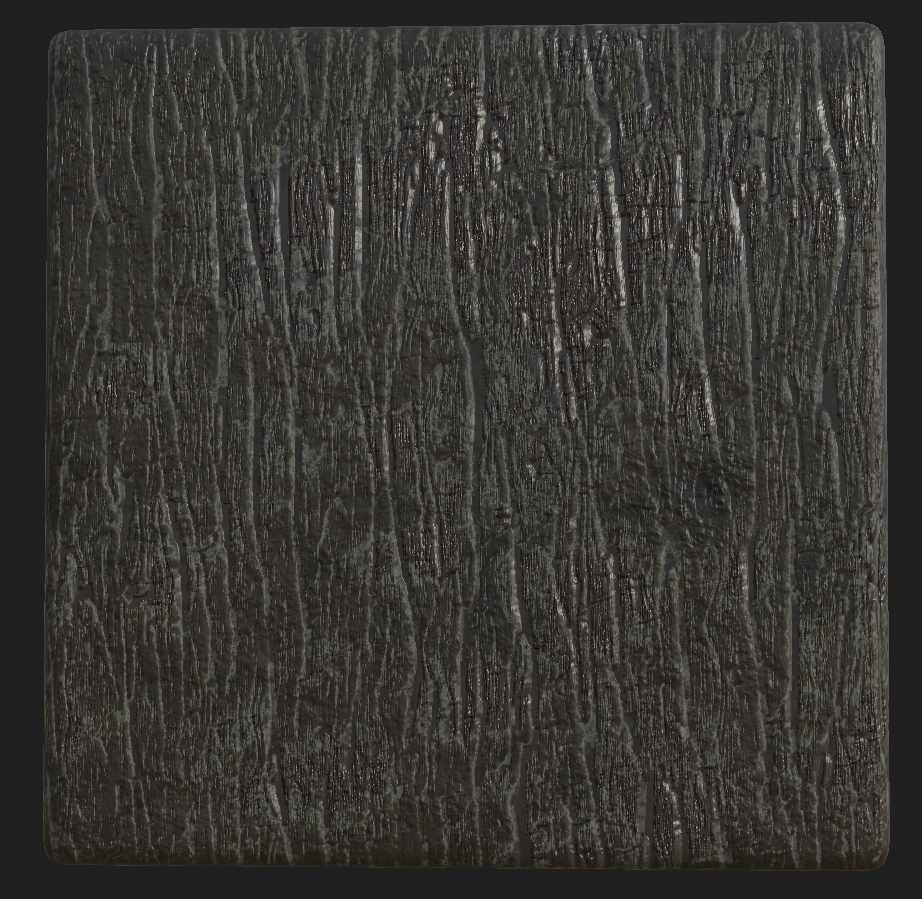
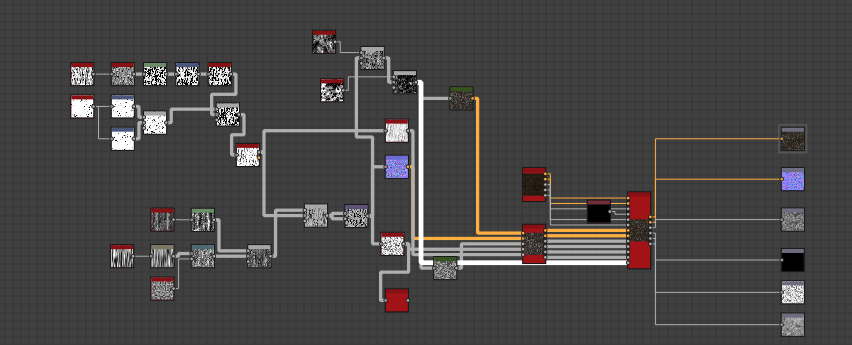
Moving on from this I then went and made my wall, the wall which will be situated on the right side of the render/start screen and taking up around 5% of the screen space. The way I went about making this (because it was such a small part of the scene) was by creating a basic shape and using the texture to fill out the objects small geometry. I made this piece modular as well so that way it uses up less memory as well as it will be a easy tillable. Here is a image of it with a few textures I had made previous for this object. Although the left image shows a lot of geometry it's only 400 tris. The reason for it having so much geometry is so the texture sits well and can if needs be, be vertex painted over at a later date with more moss etc. in engine. Not only this the maps are completely adjustable in engine and if the noise is too much I will be toning down the normal's in UE4 by using the FlattenNormal node along with a Parameter to give judge on how much or how little it should be flattened. Shown below is the image of the graph. This was later changed to be done in the editor but I'd like to showcase that I can do it in engine as well.


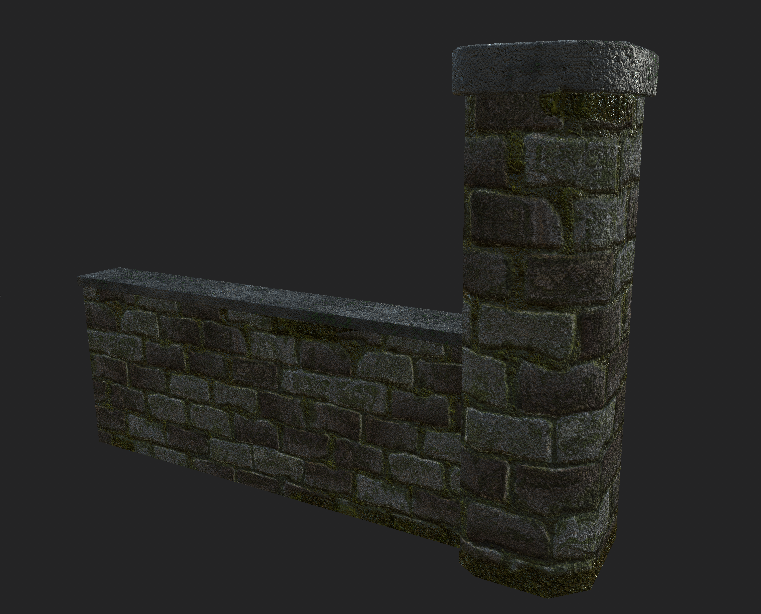
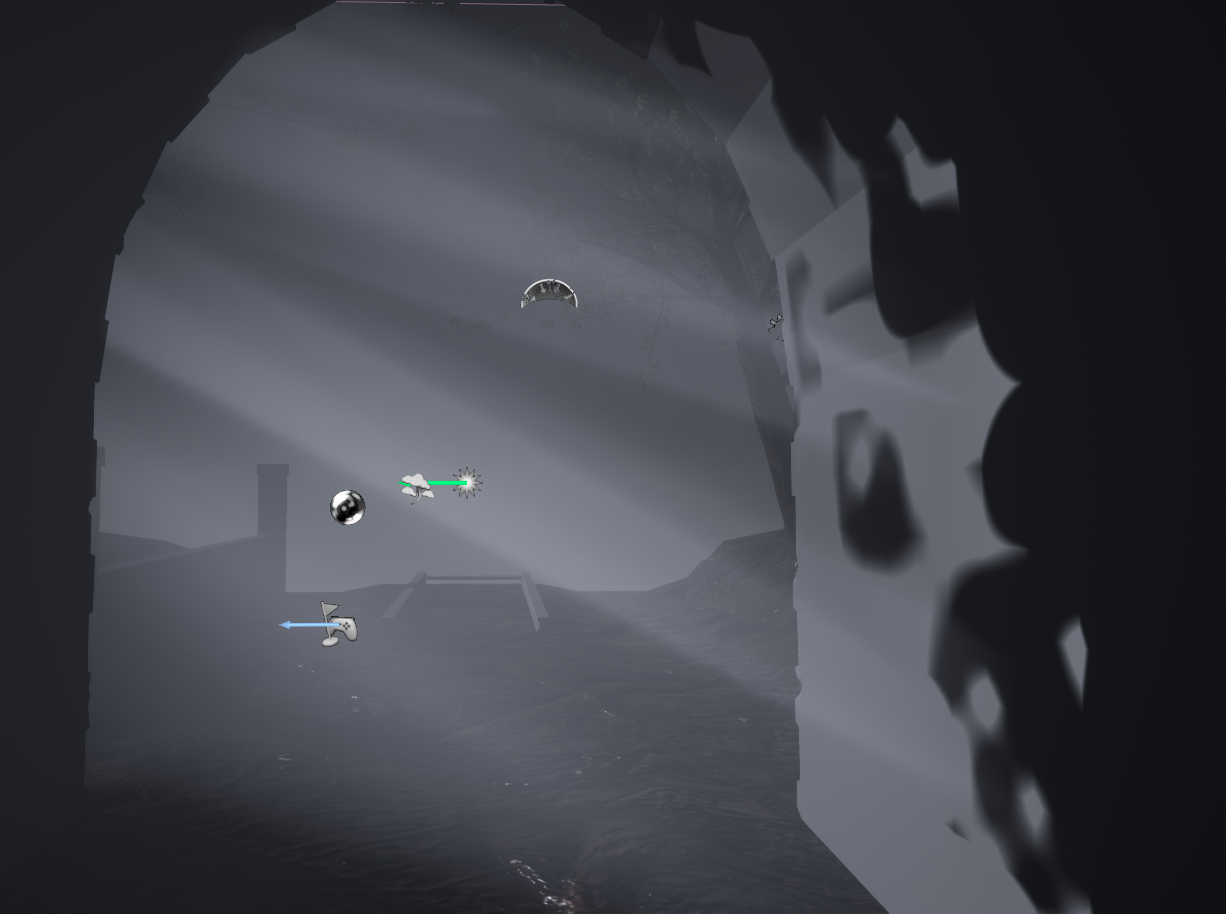
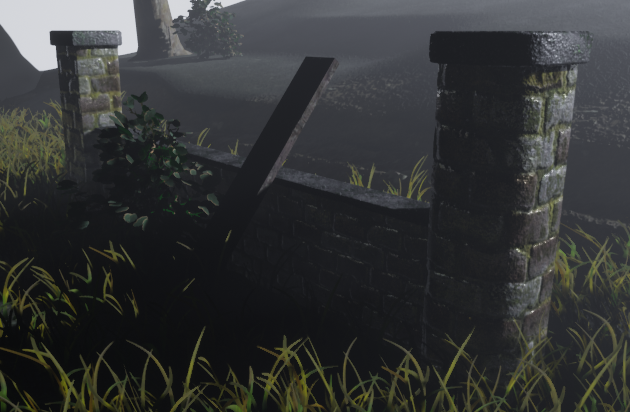
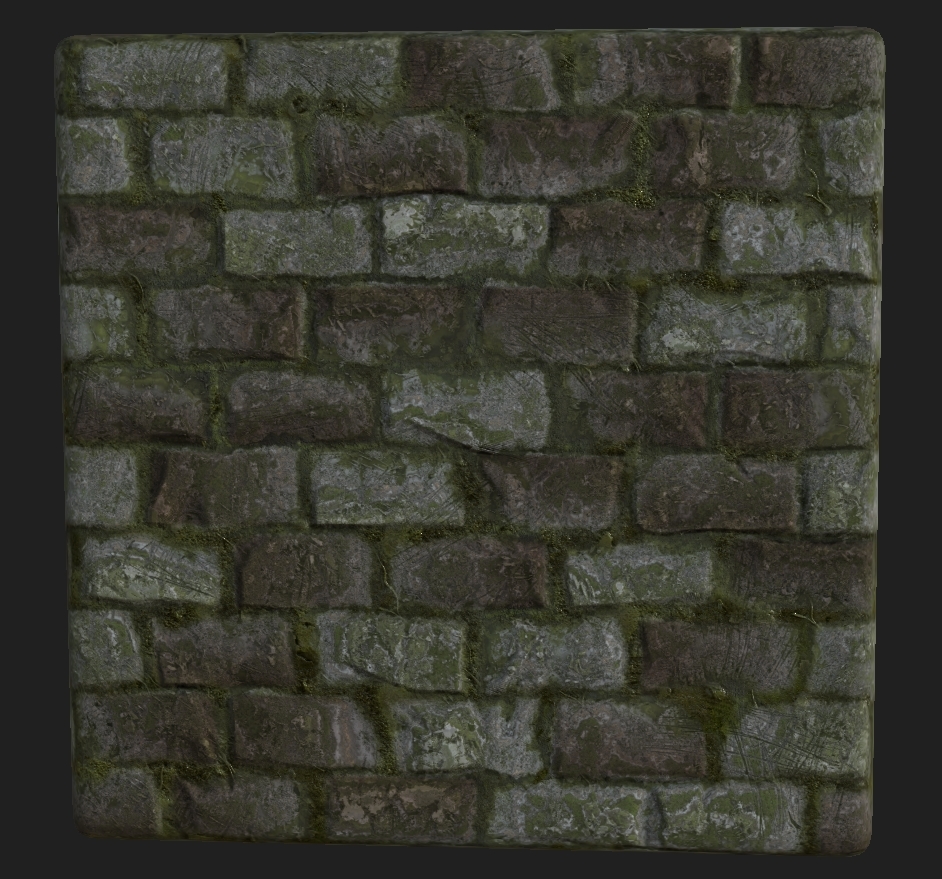
The overall shaping of the wall could be broken down and worn but instead I wanted a dilapidated feel which hopefully is going to be given off in the final project, less broken down more overgrown hence the moss, crack filled moss as well as a overall darker tone on the brick work. Below is a image of the final form of the wall (without the displacement fog).


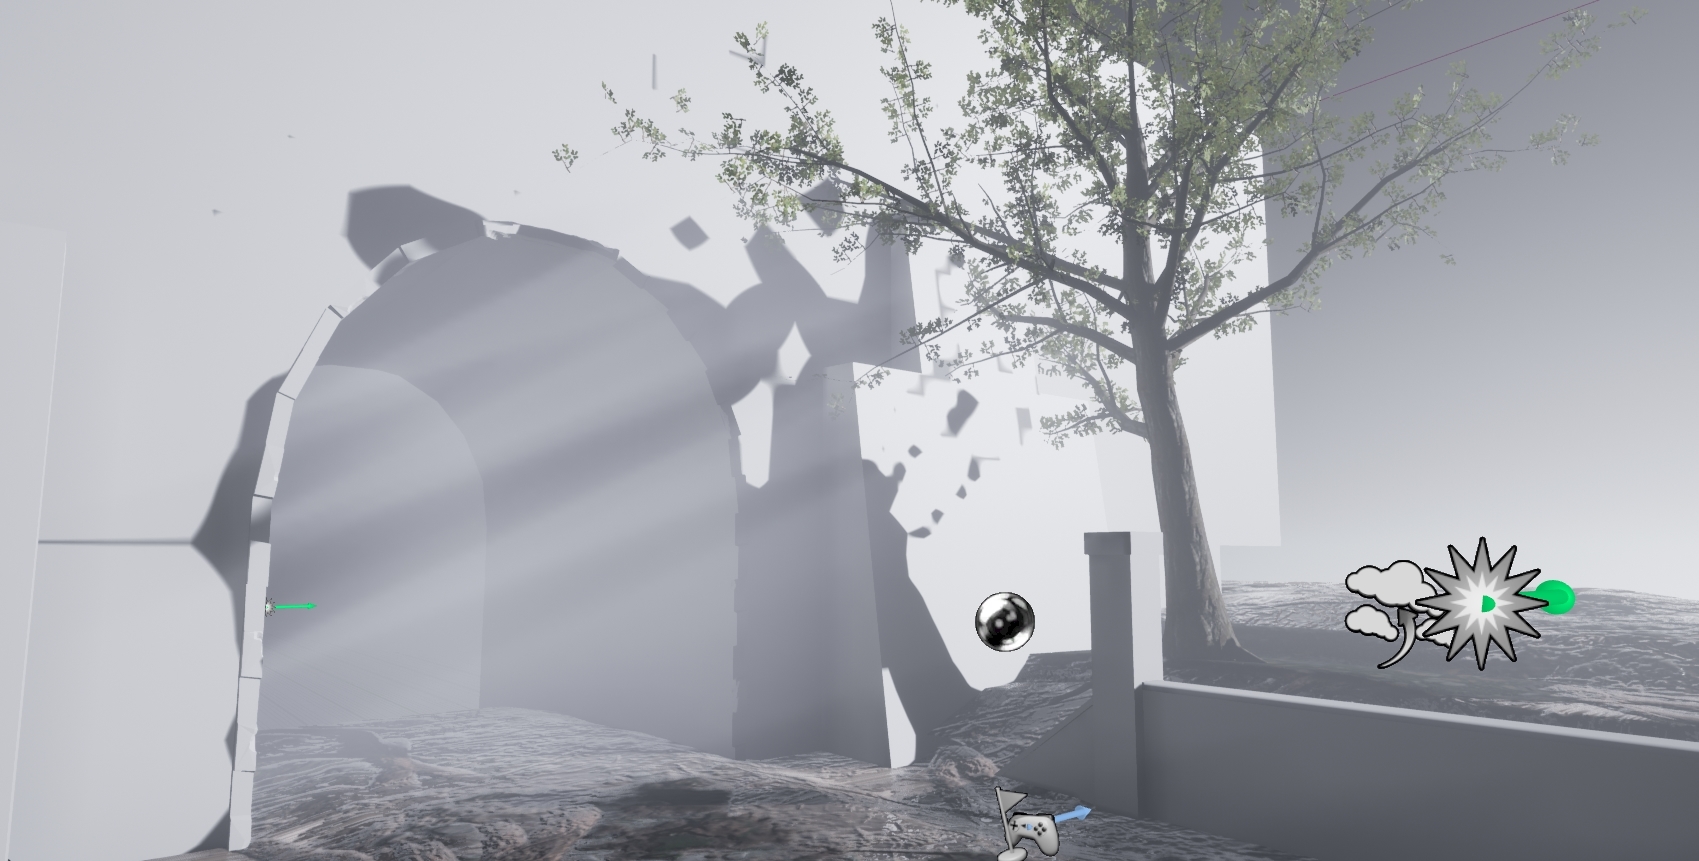
The trees/bushes created in this project are all from speedtree (see learning speedtree for more information) based around the Missouri forest as mentioned before. I have learnt a lot of different things about the program including wind, base structure of trees, leafs and alphas & many more things. The good thing that came about from learning this program is that it has allowed me to extend my knowledge on organic modelling as well as having a understanding of trees and how they work in the Unreal Engine. Aside from the Oak tree made in the first blog post I also made a GreenAsh tree and a Bush to add into the scene to fill it up a bit more. Although these are minuscule pieces they have taught me the program in more depth that the Oak tree did.

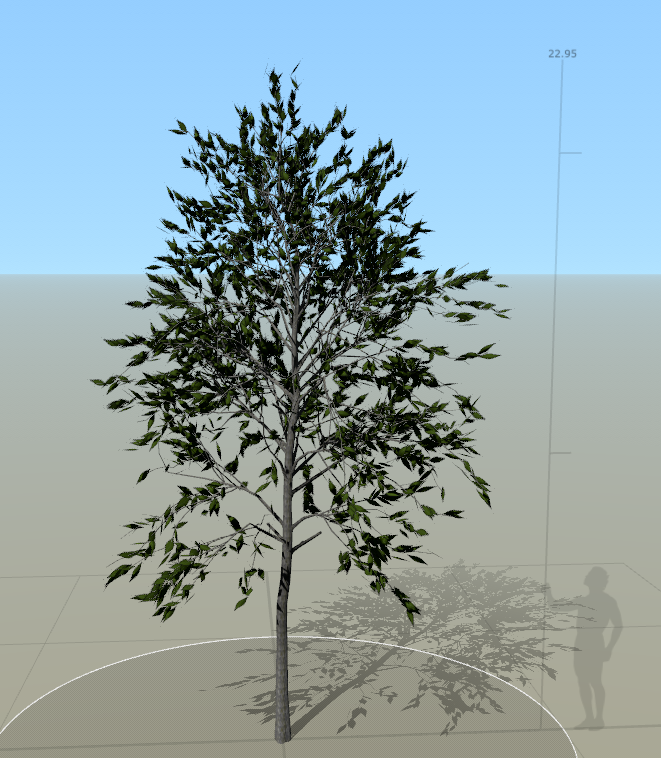
The Green Ash tree tends to grow to 80 feet in height (23.9m), meaning that I would have to make it around 23m in height for it to be realistic. The tree itself used the leaf I made in the generator as well as the bark texture re-colored to make it fit. Now you may think that using the speed tree wind generator in engine would be a good idea, nope. The wind generator only works if set above 1 meaning strong winds if you were to put it into the Unreal Engine.


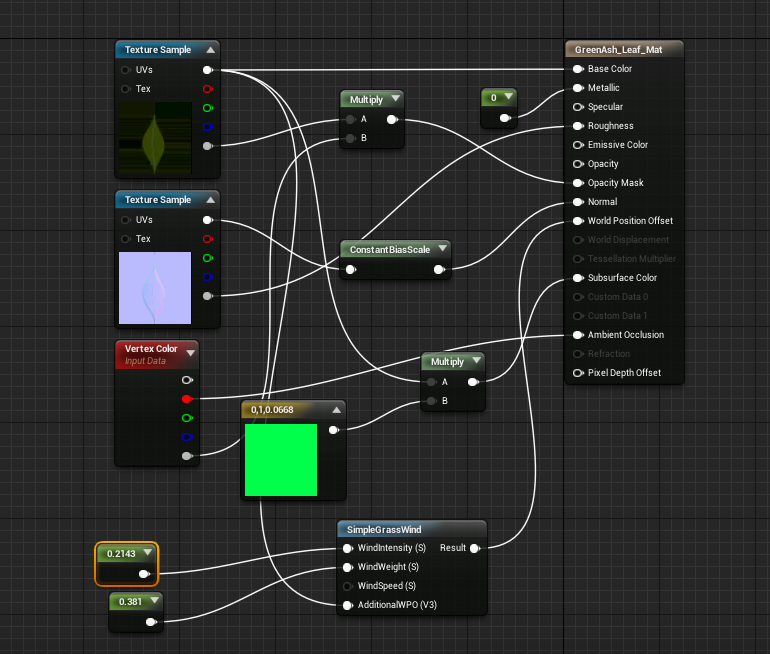
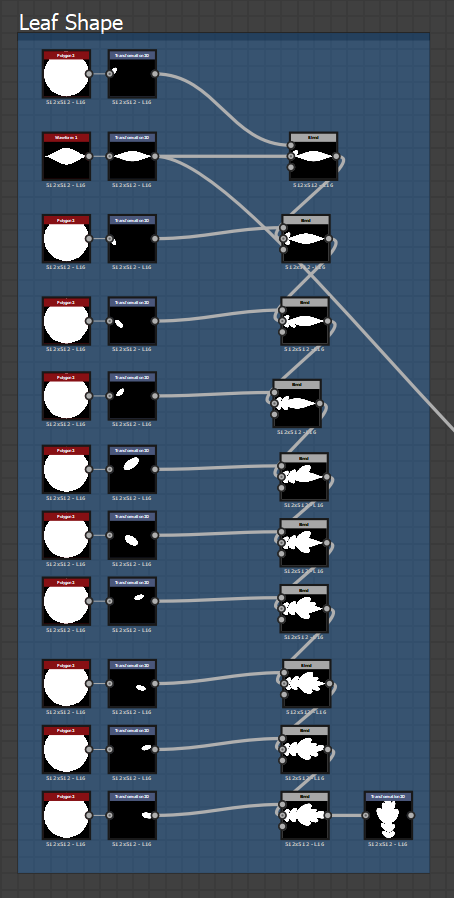
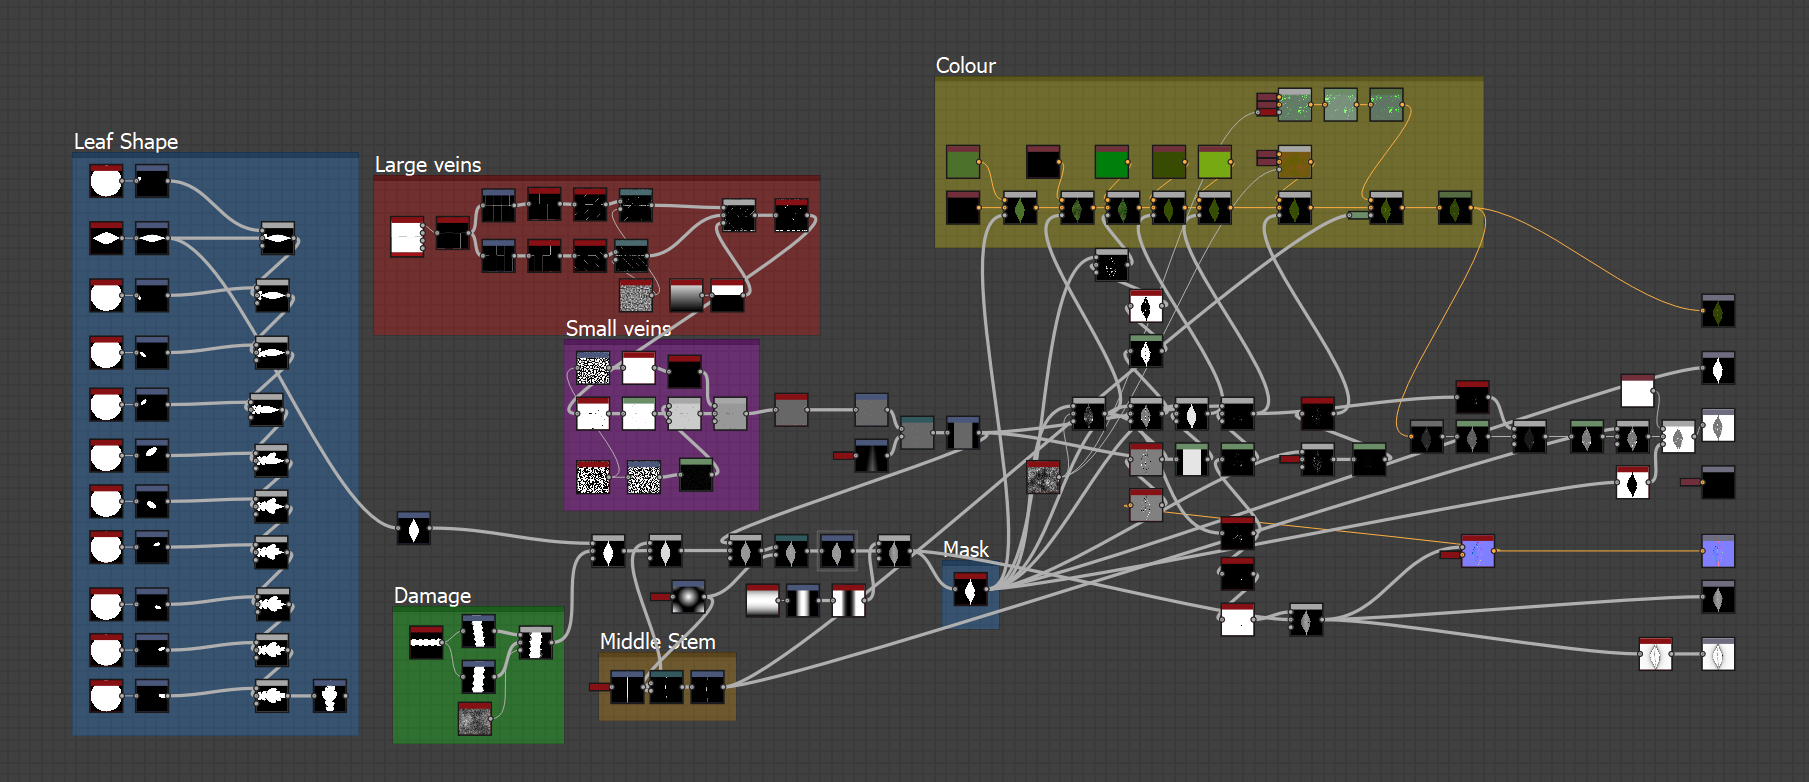
Instead what I did was create the wind in the Unreal Engine, I used the Wind Directional Source and changed the strength and speed to 0.2 and then had no gust. I then went and added in the wind to the Leaf materials (when added them to the trunk it looks unrealistic) and used constants to create a idea of what sort of intensity I wanted them at. Not only this, the subsurface scatter map doesn't port over from Speed Tree as well as I wanted it to into UE4 so I have to make my own in UE4 as well. The way to do that is very simple, change the shading model of the material to Two Sided Foliage then add in a base color into a multiplier with the base color of the leaf and plug that into the subsurface color. The graph shown below is the overall finished product of the leaf with wind & subsurface scattering included. Although these things are minimalist it adds to the overall realistic feel of the trees themselves. (Tri-Count of this is 15k)


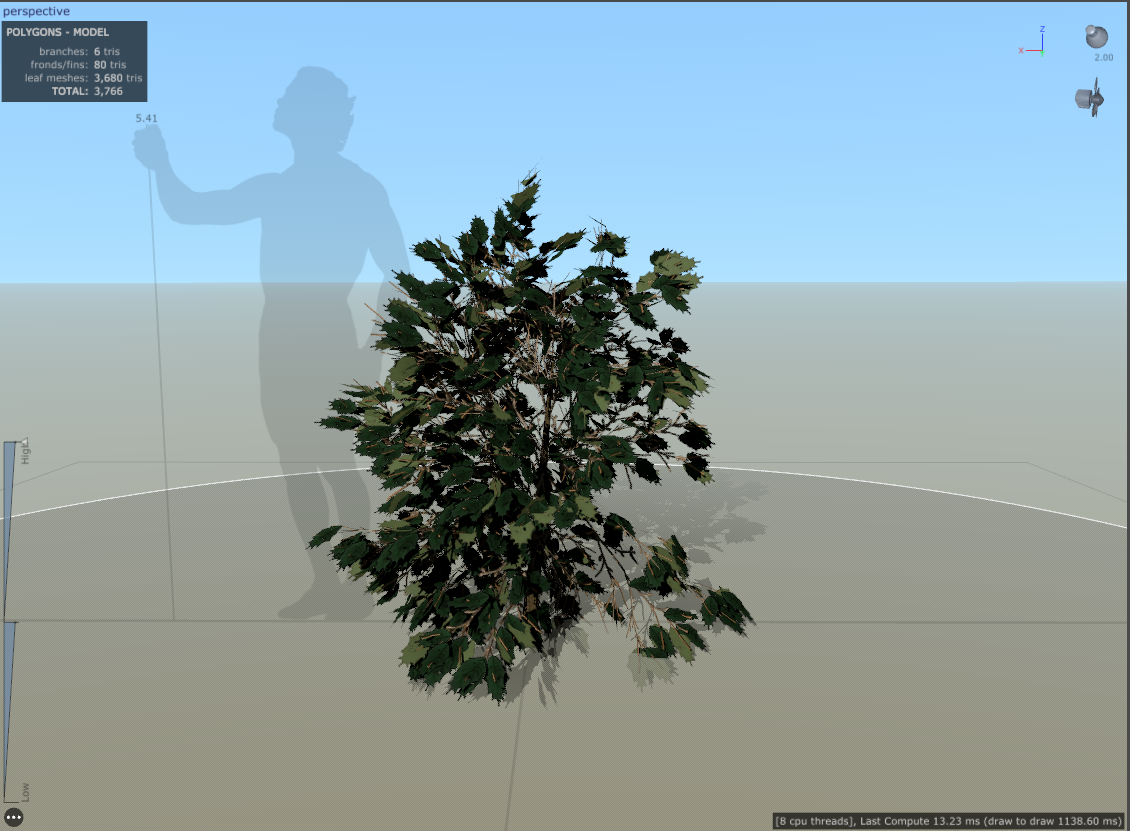
The same process was done with the bush although more basic. After understanding how the wind, subsurface scattering and overall scaling of foliage works the bush was just finding a reference (American Holly found on the western side of the Missouri forestry) create a small trunk, smaller branches and adding in spiky leafs. The rest I can just copy over from the tree because the wind power would be the same (although it was slightly adjusted as wind travels at different speeds dependent on how high up it is) as well as the subsurface scattering. The only thing this tree has different is that instead of the smaller branches being 3D I made them into alphas to make them look more realistic (Turned the branches in Speedtree from 3D to 2D and added my own texture). Other than this the only other thing to mention is the vertex painting but that will be in a separate post.


All the references from trees are from the Missouri department of conservation website which can be found in the references as this is where I have taken many different images from as reference. This website is the life and soul of my project right now seeing as it's the only website that gives out all the factual evidence I need. The next hurdle I have to come across is vertex painting the landscape, this will be done in the coming week/weeks and I will mention about the textures made in that post.

References:

Johannes Plenio, (2016), shallow-focus-photo-of-train-rail [ONLINE]. Available at: https://www.pexels.com/photo/shallow-focus-photo-of-train-rail-1165994/?fbclid=IwAR3i-J2xaMnVe6jiZ5aI2MthaNF8D_mUbYhzyPscIkMMQp20zPV5VpCDb98 [Accessed 17 October 2018].

Missouri department of conservation. 2018. MDC Discover Nature. [Online]. [25 October 2018]. Available from: https://nature.mdc.mo.gov/

Substance Designer

The concept for this blog post is going to be primarily all of my textures, how I break some down, explain them and how they are referenced. As shown before the texture for the tree was made that is quite a basic version of some of the graphs that I have created for this project, I will be primarily showcasing some of the workflows here rather than explaining every single node because that would take some serious time which I don't have on this project. There will be one or two which I will explain because of the amount of help they've given me but for most it will be a brief explanation and reference.

Note: The only textures I wont be talking about here are the ones explained in other blog posts (including:  Bark see 'Substance Designer - My methods - Tree Texture', Floor textures see 'vertex painting')

 First Graph - Leaf Generator
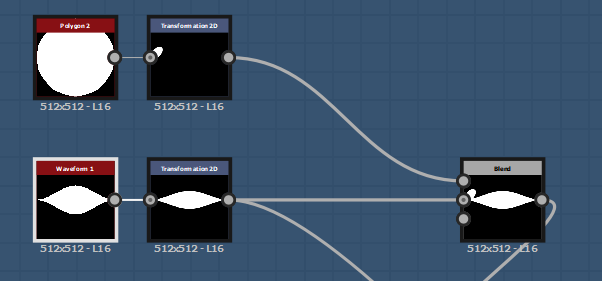
Start off I wanted to do the ones I wish to talk about first, this is my first ever leaf generator. You may have read previous that I have made a leaf in substance, this was good but I wanted to take it further and be able to make multiple leafs out of one graph. So what I thought about was shaping a leaf, the idea of a leaf shape was hard enough because in substance everything patterns itself. I then remembered how the transform 2D node allows you to turn of tiling as well as lets you size and shape anything you want, although this may not be the best way to do it I set it up like this. Using a waveform node and turning everything in the node options (aside samples) to 1 it gives you a generic leaf shape. I then thought why not do it like Photoshop and just pain over it a few times to create the basic shape you want, I then done this, both images below explain my process visually.


Although this is a long process you can see the difference in what I have made, going from a standard leaf shape to a oak leaf which was used in my scene. This again allows anyone to shape whatever they like and have it so that the shape immediately looks like a leaf with veins, a stem and anything else they wish to add like damage etc.

Second detail would be the veins, like I said before it is all completely adjustable and anyone with the graph has complete control over what they can make and with the layout of the grid hopefully it is simple and understanding. The veins themselves are easily manipulated and can be transformed, moved or even completely deleted if they want, intensity settings in the histogram scan as well as height mapping with the invert gray scale and histogram range.


Next the damage node, it is at the beginning of the graph because it is the base of color, scaling of the leaf, form as well as age. It is blended with the shape with Min (Darken) so the damage is just a background damage I'm yet to work out if anything else would be better here but this was taken from a previous guide (https://www.youtube.com/watch?v=_UeCIak8sBk) which shows you how to add small edge wear to the leaf itself. Although his isn't exactly like this it still works with the same concept in mind. Whether or not it is better or worse in some opinions it works, this can be completely manipulated so if you don't think it looks good you can completely rearrange it to your own liking.


For the stem, the idea was to create literally a small stick going from top to bottom with a cut off point. Very simple, no need to explain this, if you want to change it you can easily because all it is is a shape, 2D transforms and a directional warp.


The curvature in the leaf is from a basic 2D transform with a shape put into the intensity of a directional warp. Normally people would use something like a cylinder or a circle to create this but I wanted it to be really intense and adjustable so what I done was added a cone with a tiling of 1 so that I can tile it in the 2D transform and make it completely adjustable.


Other than this the basic shape has been made now it's just for the coloring which is again completely adjustable but with a few other bits thrown in to create height maps, ambient occlusion, normal, metallic, mask, roughness and the overall base color. I would explain the graph in more detail but it's minor details added in from here onward. Here is the overall graph for you to get a understanding of the layout and how I went about starting the graph all the way to the end.


This in the end was how I made all of my leafs for my scene as it was quicker and easier than doing the version made by Paton Varney, although the results he gets are much more realistic I've had to devote my time elsewhere in terms of leafs so using the methodology had to be used due to time restrictions. I showcased the first leaf in this graph because it was the most basic to peoples understandings, it is a Green Ash (Fraxinus pennsylvanica) leaf shown below is the reference.

Image result for green ash leaf(MDC Discover Nature, 2018)

-

Brick Texture (St.Louis No.1)

The concept behind my brick texture was to firstly get a understanding of what the brick is made out of and then secondly the color pattern, everything else would be irrelevant as most of these bricks will be covered in moss and damage. The reason I wanted to get as close to the materials and brick work as possible is so that it creates a sense of realism within the project even though the graphics wont be 100% realistic. I carried this over from my previous project and decided to work on the material some more. This will be the first time I'm using material blends so hopefully the outcome is suffice.


Again this graph is completely adjustable with a random modifier I added onto the graph allowing anyone to take it and have it instantly adjustable (Random seeding). The graph is laid out so that anyone can go in and understand what is going on and can easily adjust it to their own. I do this in case one day in the future someone has the file and I'm not there to explain it to them. (This was put into a RMA map for the project but the screen shot is out dated in terms of that).


Image result for Missouri Bricks(Liz Hayden, 2014)


-

Wood texture (Rail wood)

The good thing about having material blend is the ability to use textures already in the scene creating a more realistic vibe. The way I went about this was using the old wood texture from the first week blog post and changing the coloring around alongside a material blend which used a grunge blend as the mask creating a dirt wood. A very basic texture with a very powerful output. Shown below is the train track wood it was used on.


Although the grid isn't complex it works for what it's used for, again this was RMA packed for UE4.


This reference for the wood is from a olden rail road, although the color pattern doesn't match the overall concept does as it has masked damage/mud along with corrosion. The reason I chose a different color pallet is because in Missouri they have different types of wood they would of used.

Related image (Tom Barrett, 2016)

-

Metal Rust - Rail Road Track

This is one of the most basic textures in the entirety of the scene it is also the most used as it will be used on 3 different objects, the rail road track, the holders and also the wire holder. Its very basic nature being a metal with rust over it allows me to re-use it and also create texture sheets for it. I will be using the texture sheet for the rail road track as well as the wire holder whereas the holder itself will have its own sheet. As for this one, every single rail road you know of is made from Steel, there can be variants which use iron but that is a very rare case. Therefore referencing a image is kinda useless as the rust itself will never be the same as the image because of where the detail would normally lie. The only thing I used was the color dropped choosing the colors I wanted as the steel/rust other than that the texture is as simple as it looks.


The reason I only made a few textures like this is because they are completely repeatable and can be generated into many other concepts. The brick wall will help me to create the overall tunnel, the leaf generator will help create any tree I want (using the bark from the previous post as well) the rusty metal is completely changeable making it seem as if I've gone and made a bunch of textures when in reality I've just used the same ones over and over but change around the variables making them seem as if they're not the same texture. I learnt this process from Daniel Thiger the lead environment artist at Bungie who has made simple geometry look as realistic as possible (https://www.artstation.com/artwork/xzAB5E The artwork that uses bare minimum geometry) and made so optimized it can be used in a game. The inspiration taken from him has helped me to develop the whole of this project and hopefully my final scene will be game ready if not at least some level of start screen/render.

References:

MDC Discover Nature. (2018). Green Ash. [online] Available at: https://nature.mdc.mo.gov/discover-nature/field-guide/green-ash [Accessed 20 Oct. 2018].

Liz Hayden, (2014), St. Louis’ Brick Paradox [ONLINE]. Available at: http://www.urbanistdispatch.com/2019/st-louis-brick-paradox/ [Accessed 21 October 2018].

Tom Barrett, (2016), Divide [ONLINE]. Available at: https://unsplash.com/photos/wqQ4NNG_J28 [Accessed 21 October 2018].

Sunday, 4 November 2018

Atmospheric lighting/Fog

This is my first time touching the lighting/fog in UE4 especially at a high level. The idea I had for my scene was to have the overall tunnel 'leaking' fog with shadows going through the fog using light. The first way I thought about doing this was completely in engine, looking at other peoples work and what I want to get out of it was key. The overall look is something along the lines of Gökhan Karadayı shown below, this is from his ArtStation. He uses Volumetric fog to create a overall look with some displacement fog to create more fog in certain areas. I thought the best way of going about doing this was by using a particle effect. Most of the work shown here is from peoples ideas/concepts as well as some forums on how to create the most realistic fog in UE4. I took some ideas from them and then created my own because I didn't want realistic I wanted a HD level.

Image result for fog ue4

I started off by making a material as most do before creating a particle effect. I started by changing the overall material from surface to volume because it's a volumetric mesh & the blend mode to additive so that it can determine how the color is blended with the background colors allowing color to flow through the fog although I will be setting a overall color. I then added in a albedo of just a basic white color, absolute world position so it can be moved though it's going to be a low-level fog. Particle position so it follows a path and the a particle radius so it has boundaries. I added that into a sphere mask so that I can merge it all into one mask and then subdivide it by a certain amount to make it fit the scene. I then plugged it into the extinction so I can control the translucency of the overall material. The image shown below is how I had it laid out.


I then went and make a particle effect which if used correctly will emit smoke at a slow pace making it look realistic and thick. To do this I had to add in a cylinder in the locations to make it have a bounding box that would fit the particle effect not just the material, other than that I don't need to add anything else. I changed the spawn time constant from 1 to 40 to slow it down and allow for motion, the lifetime min and max were set to 5 and lastly the initial size was set on the X axis to 1500. The idea behind this was to make it all look realistic with smooth elements but something didn't quite look right. I had to go back onto my previous project to see where I went wrong because the displacement and the overall feel of the fog wasn't quiet there. I then realized that my 'Distribution Float Constant' wasn't set to Uniform, because of this minor thing it made it look unrealistic. Changing this over gave it more of a motion and feel. I only changed this for the Lifetime and Initial size, not for spawn as it wouldn't make much sense to make a spawn rate uniform (Randomness is the key). That is all for the fog, now for the lighting.

The lighting was simpler to understand but only because I've touched ever so slightly on it during the previous project. The idea was to delete the sky sphere, use directional lighting and a skylight mixed with a post process volume to create exactly what I'm after, a mid-day gloomy grey sky. Using these elements I changed around the light settings on the directional light allowing for shadows to be cast as well as having a effect on the fog itself (previously setup in the material for the fog). Starting off I change the transformation so that it would shine in at a angle good enough for shadow casting but also so that peoples attention is dragged either into or away from the tunnel due to the thick fog hiding what's behind it. This means the lighting intensity must be high on the directional light but weak on the skylight so I set the intensity of the directional light to 1000 and then the overall cubemap resolution on the skylight to 256 with a sky distance threshold of 20k and a intensity of 1. I then added in a PostProcessVolume with a exposure rate of minimum 1 to a maximum of 2, the reason for this is so that it gives off a exposed look and allows the whites in the fog/lighting to be more sharp. Other than this I added in a SphereReflectionCapture to ensure everything is captured within that sphere and not using too much information outside of it allowing for better performance. The images below show off some of these effects.


Links to all forums/tutorials that helped me:

https://docs.unrealengine.com/en-us/Engine/Rendering/LightingAndShadows/VolumetricFog

https://shaderbits.com/blog/ue4-volumetric-fog-techniques